


Top Flite Cessna 182 build
 12-24-2007, 02:54 PM
#276
Senior Member
My Feedback: (16)

Join Date: Sep 2004
Location: Suffolk,
VA
Posts: 653
Likes: 0
Received 0 Likes
on
0 Posts
i am about finished with my current project a tf stinson debating on building the cessna next i am between it and the tf bonanza WHAT SHOULD I BUILD!!!!!!!!!!!!!
 12-29-2007, 03:11 PM
#277
Member
Join Date: Jul 2002
Location: DEARBORN,
MI
Posts: 52
Likes: 0
Received 0 Likes
on
0 Posts
OK Guys, dumb question. What's the best way to "curve" the top sheeting between the fin and the stab to mate up to the tail cone? I've tried soaking and water and wetting with ammonia, but I still get cracks.
HELP!?!?!?!?!?!?!
HELP!?!?!?!?!?!?!
12-31-2007, 04:47 PM
#279
Senior Member
Thread Starter

Join Date: May 2004
Location: Huntsville,
AL
Posts: 205
Likes: 0
Received 0 Likes
on
0 Posts
Wow! I'm really surprised how many contributors there have been to this thread. When I started the kit (and this thread) earlier this year, I did not realize the popularity of this model. Should not be surprised I guess, it is quite the looker.
Anyways, I am all moved and settled into my new home so I should be able to start working on the Cessna again soon. My family and I just moved all the way from Oregon to Alabama for my new job. It was a long ways, but the new job is worth it. I am now doing design work for the International Space Station and it's been an absolute dream job so far.
I just spent some time re-reading portions of this thread and let me mention that it's good motivation! Makes me want to get working on this plane again.
I love posting pictures, so here is where my cessna is right now, hanging up in the garage. It survived the move with no damage at all - which is pretty amazing.
01-02-2008, 04:29 AM
#281
Member
Join Date: Nov 2007
Location: , ON, CANADA
Posts: 77
Likes: 0
Received 0 Likes
on
0 Posts
OS .91 FX? WHat do you guys think? Will it require much cowling modification? Deadeye, what does that glow heater do?, is it the closest thing to electric start on these small engines?
Does anybody have any other suggestions for the powerplant, my plane will prob weigh in at about 13-14 lbs. glassed.
Thanks Folks.
Does anybody have any other suggestions for the powerplant, my plane will prob weigh in at about 13-14 lbs. glassed.
Thanks Folks.
01-02-2008, 09:38 AM
#283
Senior Member
Thread Starter
Join Date: May 2004
Location: Huntsville,
AL
Posts: 205
Likes: 0
Received 0 Likes
on
0 Posts
polakowa - The 91FX fits in the cowl w/o cutting but as you mentioned it's the muffler that presents a problem. Since this looks like it will be the engine I will be using as well, it is a problem that I will be looking into.
I have a pits muffler I can try out, but I'm sure it won't be as clean as the top flight in cowl style for the .60 size engines.
Maybe a custom muffler?
I have a pits muffler I can try out, but I'm sure it won't be as clean as the top flight in cowl style for the .60 size engines.
Maybe a custom muffler?
01-02-2008, 11:37 AM
#284
Senior Member

I used a Magnum 91, inverted, and had to cut a postage stamp size hole in the bottom for the valve covers. Exhaust is stock, with the elbow heated and bent in slightly. Then I used a Dubro muffler deflector to get the exhaust to come out the cowl flap. The on board glow simply heats the plug at a programmed point. Mine turns on at anything below 1/4 throttle. I still have to use a starter to start my engine, but FEMA makes an electric on board starter if the weight doesn't bother you.
 01-02-2008, 07:45 PM
#286
Senior Member
My Feedback: (16)
Join Date: Sep 2004
Location: Suffolk,
VA
Posts: 653
Likes: 0
Received 0 Likes
on
0 Posts
ORIGINAL: teookie
polakowa - The 91FX fits in the cowl w/o cutting but as you mentioned it's the muffler that presents a problem. Since this looks like it will be the engine I will be using as well, it is a problem that I will be looking into.
I have a pits muffler I can try out, but I'm sure it won't be as clean as the top flight in cowl style for the .60 size engines.
Maybe a custom muffler?
01-03-2008, 09:15 PM
#287
Member
Join Date: Jul 2002
Location: DEARBORN,
MI
Posts: 52
Likes: 0
Received 0 Likes
on
0 Posts
I had originally bought a ST .75 two stroke for this project. In light of the not so good things I've heard about that engine, however, I'm thinking of changing to an O.S. .75 AX.
Does any one have any experience with this motor?
Does any one have any experience with this motor?
01-10-2008, 03:06 PM
#288
Senior Member
Thread Starter
Join Date: May 2004
Location: Huntsville,
AL
Posts: 205
Likes: 0
Received 0 Likes
on
0 Posts
I got a few more things done on the cessna last night. It's not much, but the way I'm looking at it is they are all things that have to be done before it can fly. :-)
First I worked on fitting the windshield. I cut a groove on the fwd upper fuse to allow the front edge of the windshield to sit flush. The back edges of the windshield I will just feather into the rest of the fuse w/ filler.

This is the groove I cut with my Dremel. Was not really that hard. I first positions the windshield and traced out where it met the fuse. Then I used a profiled grinding bit on my dremel. The profiled bit let me cut directly into the fuse even with the dremel held at an angle.

Here's the windshield sitting in it's new groove. Once it's glued in it will take a minimul amount of filler to make a perfectly smooth transition.

I cut and test fit the rudder hinges. As I've mentioned before, I'm using CA hinges here.
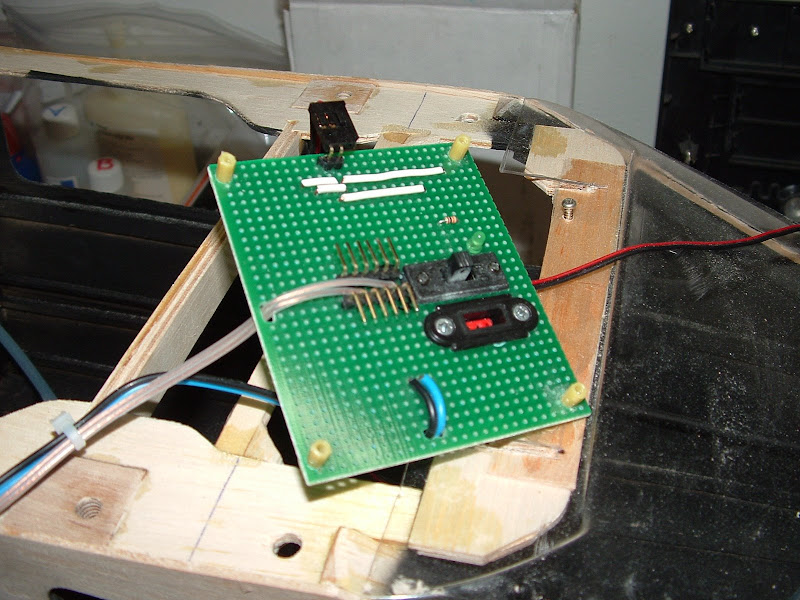
I also got the charging jack mounted on my circuit board.
I'm hoping I will be working on the plane more in the coming weeks so check back later for more updates!
First I worked on fitting the windshield. I cut a groove on the fwd upper fuse to allow the front edge of the windshield to sit flush. The back edges of the windshield I will just feather into the rest of the fuse w/ filler.
This is the groove I cut with my Dremel. Was not really that hard. I first positions the windshield and traced out where it met the fuse. Then I used a profiled grinding bit on my dremel. The profiled bit let me cut directly into the fuse even with the dremel held at an angle.
Here's the windshield sitting in it's new groove. Once it's glued in it will take a minimul amount of filler to make a perfectly smooth transition.
I cut and test fit the rudder hinges. As I've mentioned before, I'm using CA hinges here.
I also got the charging jack mounted on my circuit board.
I'm hoping I will be working on the plane more in the coming weeks so check back later for more updates!
01-10-2008, 03:31 PM
#289
Senior Member
Join Date: Oct 2006
Location: valdosta,
GA
Posts: 211
Likes: 0
Received 0 Likes
on
0 Posts
Lookin good teokie! I like the idea with the cut for the winshield, should look excellent when its done. I may get back to work on mine one day, had to build a piper cub kit for a guy thats almost ready, getting covered now.
There is a show in Perry, Georgia at the end of February, now that ur closer, may be worth the drive.
Nick
There is a show in Perry, Georgia at the end of February, now that ur closer, may be worth the drive.
Nick
01-10-2008, 03:39 PM
#290
Member
Join Date: Nov 2007
Location: , ON, CANADA
Posts: 77
Likes: 0
Received 0 Likes
on
0 Posts
teokkie,
I noticed your rear cowl is not fitted too the fuse yet. It almost looks as mine does, too small to fit well with the fuse. What are your plans there. The windshield indentation is a great idea and i will definately be using such an idea. (all coypright permissions considered . How come you decided on CA hinges rather than dubro pin hinges? How did the slot cutting go for the installation, did u find it easy, how did u do it i guess is what I am asking becuase it seems like the easiest way to hinge this model.?
Oh and keep up with the pictures looking good!! You think 209.99 is good price for O.S. .91FX?
I noticed your rear cowl is not fitted too the fuse yet. It almost looks as mine does, too small to fit well with the fuse. What are your plans there. The windshield indentation is a great idea and i will definately be using such an idea. (all coypright permissions considered
. How come you decided on CA hinges rather than dubro pin hinges? How did the slot cutting go for the installation, did u find it easy, how did u do it i guess is what I am asking becuase it seems like the easiest way to hinge this model.?Oh and keep up with the pictures looking good!! You think 209.99 is good price for O.S. .91FX?
01-10-2008, 05:56 PM
#291
Senior Member
Thread Starter
Join Date: May 2004
Location: Huntsville,
AL
Posts: 205
Likes: 0
Received 0 Likes
on
0 Posts
polakowa - I think thats the going rate currently. I seem to remember getting mine for $190 or $200 but that was something like 8 years ago.
The CA hinges are just as easy as hinge points. I've got one of those basic [link=http://www3.towerhobbies.com/cgi-bin/wti0001p?&I=LXE229&P=7]click [/link]hinge slotting tools that makes it real easy. I used CA hinges because I could not get the hinge points installed due to the weird angles associated with the tip fairing. Hard to explain exactly how it interferes, I know some have reported success with hinge points though.
My rear fairing is already glued on and it's a bit of a pain. I'm not sure I'll be able to get it looking right with just balsa filler and fiberglass. I think bondo would be the ideal solution, but I've never used it before and thats putting me off. We'll see what I end up doing...
01-10-2008, 08:57 PM
#292


Join Date: Jul 2004
Location: Middleboro, MA
Posts: 3,275
Likes: 0
Received 0 Likes
on
0 Posts
Teooke,
One thing that you may want to consider using for the filler on the rear faring is micro balloons mixed with epoxy as a filler. It will sand a lot easier than bondo and is a lot lighter, mix in the micro balloons to get something about as thick as toothpaste. The longer cure time epoxy works best to give you some working time when mixing and putting it on, I am considering using finishing resin as it has a long cure time.
One thing that you may want to consider using for the filler on the rear faring is micro balloons mixed with epoxy as a filler. It will sand a lot easier than bondo and is a lot lighter, mix in the micro balloons to get something about as thick as toothpaste. The longer cure time epoxy works best to give you some working time when mixing and putting it on, I am considering using finishing resin as it has a long cure time.
01-11-2008, 12:32 AM
#293
Senior Member
Join Date: Sep 2004
Location: Denton,
TX
Posts: 295
Likes: 0
Received 0 Likes
on
0 Posts
I had my first experience with micro ballons and epoxy just the other day, and all I can say is "Genius". Very light, very strong, very easy to work with.
01-11-2008, 01:04 AM
#294
Join Date: Jul 2004
Location: Middleboro, MA
Posts: 3,275
Likes: 0
Received 0 Likes
on
0 Posts
One other tip for you guys building that I got from a buddy who is a CL stunt guy. Rather than using glass and epoxy look at Carbon fiber veil .2 Oz. to yard applied with dope like we used to do silk over a sheathed surface. I saw part of the plane he was building and the strength and light weight of it is totally wild! Beats fiberglass hands down, and is much easier to work with in my opinion. I am going to use it on a build I am doing right now but have not gotten far along yet (mentioned in a kit build thread).
01-11-2008, 01:17 PM
#295
Senior Member
Thread Starter
Join Date: May 2004
Location: Huntsville,
AL
Posts: 205
Likes: 0
Received 0 Likes
on
0 Posts
Micro balloons are a great idea! I'll will give it a go and report how it went.
Last night I figured out what resistors to use for my LED's. There not crazy bright like the high dollar pre made nav lights, but I think they will look great at dusk. The red LED on the left is a blinker (strobe).
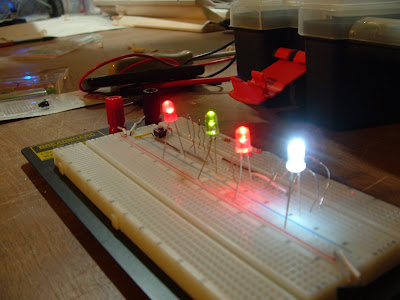
I wish green LED's were brighter.
Oh, and I think I will try using mini-mag light bulbs for the landing lights. Those suckers are bright!
Last night I figured out what resistors to use for my LED's. There not crazy bright like the high dollar pre made nav lights, but I think they will look great at dusk. The red LED on the left is a blinker (strobe).
I wish green LED's were brighter.
Oh, and I think I will try using mini-mag light bulbs for the landing lights. Those suckers are bright!
01-24-2008, 09:02 PM
#296
Member
Join Date: Nov 2007
Location: , ON, CANADA
Posts: 77
Likes: 0
Received 0 Likes
on
0 Posts
Is it just me or do you guys find that it is impossible to find wheels that are balanced and spin true. I just bought the dubro wheels for the fairings and they are way outta wack. Anybody have any suggestions as to a good wheel(s). ALso if anybody has any photos or advice regarding the wheel/fairing installation please share as I am now in that phase and am sure some people have some stories to share as I am findng. Bought fiberglass fairings and had to innovate to get the main two wheels axle through the wheel inside the fairings.
Teokkie, any news on the in-cowl setup for yours?
Teokkie, any news on the in-cowl setup for yours?
01-25-2008, 02:13 AM
#297
Member
Join Date: Nov 2007
Location: , ON, CANADA
Posts: 77
Likes: 0
Received 0 Likes
on
0 Posts
Also does anybody have any recommendations on how to install the servos in the fuselage. I can't figure out for the life of me how to drill the front two pilot holes for mounting the servos, there is not enough space to work with. Please help me with this as i really dont want to ruin the balas/fiberglass covering.
Thankx
Thankx
01-25-2008, 09:17 AM
#298
Senior Member
ORIGINAL: polakowa
Also does anybody have any recommendations on how to install the servos in the fuselage. I can't figure out for the life of me how to drill the front two pilot holes for mounting the servos, there is not enough space to work with. Please help me with this as i really dont want to ruin the balas/fiberglass covering.
Thankx
01-25-2008, 03:35 PM
#299
Senior Member
Join Date: Feb 2007
Location: malvern,
AR
Posts: 132
Likes: 0
Received 0 Likes
on
0 Posts
I did the same thing when I built my first cessna, providing you did not install the front window I got some small wood screws about the same size as servo screws with a cross tip heads. i found a small long cross tip screwdriver placed the servos in and screwed them down. the screwdriver was at an angle but it did work.
02-09-2008, 12:15 AM
#300
Senior Member
Join Date: Oct 2006
Location: winston,
MO
Posts: 1,378
Likes: 0
Received 0 Likes
on
0 Posts
deadeye could you post some pic's of your cessna, a friend of mine was wantint to use a satio 100 he already has but is a little worried about cutting the cowl up to much he wants it to look as scale as possible but really doesn't want to buy another motor

