


What have you done to your RC today?
 07-27-2024, 08:58 PM
#551

Join Date: Jul 2007
Location: North West Indiana
Posts: 12,845
Likes: 0
Received 13 Likes
on
12 Posts
Well today I converted a HPI Nitro RS4 MT2 to electric in the smoothest cheapest conversion I've done yet. Well its almost done I gotta slap tires on it, zip tie electronics down, and test it, but it should work fine.
But seriously I started with the idea yesterday afternoon spent 2 hours or so looking for a few parts, designed the chassis plate to mount the stuff to, 3d printed it for 9 hours, and assembled it today, and it went together mostly trouble free. Also spent $0 on it. I swear why didn't the Brama motor, and spur setup dawn on me 14-16 years ago to use the 1st time I attempted an electric conversion of a nitro RS4 MT
Made topic here with pics of what I did so far, and explanations of my thought process, and work flow.
HPI MT2 Electric conversion

The following users liked this post:
kistner (08-04-2024)
07-28-2024, 08:52 AM
#552

blasphemy! idk i like Nitro RS4 MT2's (although most of my experience was with the first gen) no way would i swap one to electric. iv actually been kicking around the idea of getting a Nitro Bullet and making kind of an RS4 MT3 out of it.
07-28-2024, 04:21 PM
#553
Join Date: Jul 2007
Location: North West Indiana
Posts: 12,845
Likes: 0
Received 13 Likes
on
12 Posts
Well it started as a MT1, and over time I swapped parts out that broke till everything was a MT2's 
I threw on the original stock MT1 tires today, and took it for a test. I wish I had a IR thermometer as the motor got kinda hot after 5 or so minutes of use I think I could touch it for 2-3 seconds before I had to pull away.
If its getting this hot with these tires on it the tires I really want will most likely smoke the motor (the old 60A 4000kv ez-run HW combo from way back) as they are masher 2000's I think which I used to run on it way back when.
I will say though it was rips though It feel a little faster then what I remember it was in Nitro form.
also to be fair I can easily make it nitro again as all I have to do it undo 8 screws pull the front, and rear diffs off, and put them back on the old chassis as this is a second chassis. The old chassis still has all the nitro stuff on it.
But yea I might end up making it into a RS4 Rally car(would need to get a driveshaft as I can't find the 4th) in the end as like I said it gets quite warm, and the rally tires are I would say are something like 3/4th of an inch to a full inch smaller in diameter. Or I could even make it into a MT1 as I have a full set of arms, shock towers, and stuff from one too as I had 3 MT1's at one point.
Either way I still need to make some parts like something to cover the main drive shafts to make a point to mount electronics, and stiffen the frame some so it don't flex.
I threw on the original stock MT1 tires today, and took it for a test. I wish I had a IR thermometer as the motor got kinda hot after 5 or so minutes of use I think I could touch it for 2-3 seconds before I had to pull away.
If its getting this hot with these tires on it the tires I really want will most likely smoke the motor (the old 60A 4000kv ez-run HW combo from way back) as they are masher 2000's I think which I used to run on it way back when.
I will say though it was rips though It feel a little faster then what I remember it was in Nitro form.
also to be fair I can easily make it nitro again as all I have to do it undo 8 screws pull the front, and rear diffs off, and put them back on the old chassis as this is a second chassis. The old chassis still has all the nitro stuff on it.
But yea I might end up making it into a RS4 Rally car(would need to get a driveshaft as I can't find the 4th) in the end as like I said it gets quite warm, and the rally tires are I would say are something like 3/4th of an inch to a full inch smaller in diameter. Or I could even make it into a MT1 as I have a full set of arms, shock towers, and stuff from one too as I had 3 MT1's at one point
.Either way I still need to make some parts like something to cover the main drive shafts to make a point to mount electronics, and stiffen the frame some so it don't flex.
Last edited by SyCo_VeNoM; 07-28-2024 at 05:02 PM.
07-29-2024, 09:38 PM
#554
Join Date: Jul 2007
Location: North West Indiana
Posts: 12,845
Likes: 0
Received 13 Likes
on
12 Posts
well for that electric MT2... I was going to make it into a rs4 rally as I had a set of RS4 on road arms, and parts on another chassis, but I put the rally wheels on it, and tried turning it, and they kept binding up. One of the problems being the dogbones I think are 1-2mm's too long that I have. Also the rims I wanted to use are too deep, and were also rubbing on the c-hub, but even when the rims weren't on it still was binding. SO instead I'm swapping the parts to a MT1, and I'm gonna put the MT2 parts back on the MT2.
I'm going to order a set of aluminum wheel hexes when I order a tempgun as I can't find any >.> I swear I lost those all the time so till I get that I guess I can't do much.
I'm going to order a set of aluminum wheel hexes when I order a tempgun as I can't find any >.> I swear I lost those all the time so till I get that I guess I can't do much.
 07-30-2024, 05:12 PM
#556
Join Date: Jul 2007
Location: North West Indiana
Posts: 12,845
Likes: 0
Received 13 Likes
on
12 Posts
Well I used to lose wheel hexes all the time hell I have 2-3 RC's with no wheels on them due to not having wheel hexes, and lock nuts for them, as I'm missing those I also lost quite a few of the pins, and bearings seeing there was nothing to hold them in place. The Temp gun I lost once >.> Then again it was a small temp gun that was around the size of a cars key fob I probably have it in one of the boxes I never bothered to unpacked after I moved.
Anyways the electric vehicle is a MT1 now. I put all the MT2 parts back on the nitro chassis. Just had to make a shock mount as I lost all but one of the little shock mount blocks I had for a MT1.
Before making it a MT1 I took all the plastic parts I found, and threw it in the ultrasonic cleaner letting it go a few rounds(has a 5 min max timer) to where outside scratches the parts they look new where prior they were covered with a crap load of oil, and grime. Had to put a set of new MT2 arms on that I had in the bag still as I only found 1 MT1 c-hub, but had 2 MT2 hubs.
I must have some RC parts in another box that I don't know where it is at >.>
ANYWAYS the other day I took 2 of the old MT1 HPI nitro star 15FE engines apart that I had, threw all the parts in the ultra sonic cleaner to remove all the grease and grime, and reassembled it to make an attractive paperweight.fidget toy One was completely shot with 0 pinch in the top of the stroke, and the other had so many air leaks it was impossible to tune, but both were missing parts so I took the nicest looking parts to make one engine. Only thing it is missing is a OWB to spin the crank when its pulled, but you can turn it by hand. I always wanted to do that to the engines, but never got around to it.
Kinda forgot how much I enjoyed just working on them. Running.. I sorta enjoyed, but I got way more enjoyment modding, and repairing as I had to rack my brain to figure out how to make stuff work together.
Last edited by SyCo_VeNoM; 07-30-2024 at 05:19 PM.
07-31-2024, 06:55 PM
#557
Join Date: Jul 2007
Location: North West Indiana
Posts: 12,845
Likes: 0
Received 13 Likes
on
12 Posts
got 1 set of the aluminum hex's I ordered in, and put them on my 1st DF-02 as the light blue anodized locknuts that came with the hex's matched the aluminum parts I have on it. Figured cool I now freed up 4 more plastic hex's so I could put tires on another RC... I thought wrong.
When I took the tires off the DF-02 2 of the 4 hex's were broken in multiple pieces, and a 3rd was split almost in half, but still barely together. I got another set of aluminum hex's coming tomorrow.
As for the electric converted MT I was looking at the MT2 and like damn I wish it had a front bumper on it which is the main reason I took the parts off the MT2 in the 1st place so I looked up the part trees to see how much it would cost to do it.
I almost threw up at the sight of what people are charging for the parts tree. I found one seller with the one, and they wanted something like $45 shipped for one of them, and the other one I would need was something like $30 from another seller. So yea... I decided to go another route as I remembered I had a spare bumper from my SCX 10 kit(that thing came with so many extras it wasn't funny), and I toyed with putting that bumper on the RS4 rally the other day that I had built till the dogbone issue. When I held it upto the mount it seemed the screw holes would line up right in the body mounts weren't in the way. SO I designed a piece to replace the brace in cad without the body mount posts, 3d-printed it, and yes the holes line up perfectly. I didn't want to cut the original part in case I ever decided to try the RS4 rally again ESPECIALLY with how insane the parts trees are now. Honestly I probably would have cut it if I didn't see the MT2 parts tree costs before hand >.>
I remember the Rally was kinda rare when I ordered it ages ago I don't want to even imagine if I could find one now. So anyways I swapped that in for the front A-arm holder as well as the Rally shock tower(it is almost the same as the MT1 but has 2 extra holes for the brace), and now the MT1 has a front bumper.
I'll prolly post pictures tomorrow with a write up in that topic I made on it as the new mod still isn't finished printing(2 out of 3 parts are done).
08-01-2024, 04:14 PM
#558
got word that AE is apparently going to be supporting the RC10/RC10T/RC10DS. which means as soon as i can ill be piecing together another RC10T. ...i think... ...a DS might be cool to though... ...but id get more use out of another RC10T... ...but i already have one, ...and like 3 other stadium trucks... ....but i don't really drive on road cars much... ...maybe the GT is next?...
08-01-2024, 06:58 PM
#559
Join Date: Jul 2007
Location: North West Indiana
Posts: 12,845
Likes: 0
Received 13 Likes
on
12 Posts
cool about AE I remember those things were super popular on this board for quite some time. Doubt HPI ever would do anything like support old models.
Same about onroad I have a TT01e, and that is it for onroad. Just never had any where near as much fun I had from offroad.
I pilfered the body my 4wd stampede was using for the electric MT (it was originally a body for my 1st attempt years back so it has all the holes)
Also finished all the designing of parts for the e-MT like the center braces, and am making them. (okay this happened after I typed this, but before I hit submit the front brace printed, and had issues fitting I didn't account for so it needed a minor redesign)
Think I'll make the stampede 4x4 back into a slash as I still got all its parts, and the body I originally had for it. From what I recall its differences are the front bumper, center driveshaft, and chassis plate. The pede was setup more like a stadium truck.
Last edited by SyCo_VeNoM; 08-01-2024 at 07:04 PM.
08-02-2024, 04:31 PM
#560
i really wish HPI would rerelese the RS4 mini. i used to want the nitro RS4 mini with VW Bus body. but an electric would be more suited to me these days. they have a few really cool body's for them (510, 240Z, BMW 2002) but no chassis to put them on. i would gladly put together a 510 for some driveway autocross action. i already have a Tamiya M chassis so i know the size works great for that.
they have the bullet which is like a continuation of the RS4 MT and Nitro MT. be cool if they did throwback wheels/tires and body for it. although a rerelease of the electric version would be cool as hell.
they still make the Savage.
but overall i wish they would go back to purple. never cared for the orange, and now it looks like a lot of there stuff (at least aluminum hop ups) is like a raw grey. which is boring.
08-03-2024, 12:12 PM
#561
Join Date: Jul 2007
Location: North West Indiana
Posts: 12,845
Likes: 0
Received 13 Likes
on
12 Posts
Bullet was a rebadged hot bodies(I forgot the model name), and shares nothing with the RS4 line.
Anyways I basically finished the RS4 MT1 electric. there is one minor thing I forgot to make which is an antenna mount... I'll make it in a few minutes that should be pretty straight forward. Yesterday I 3d printed a 3mm chassis braces that went from the front to the back, but there was too much chassis flex so today I took them, traced them to a 3mm piece of scrap aluminum I had from a failed project, and cut it out on my bandsaw. Now it has absolutely zero flex. The aluminum piece was actually a chassis plate I made from my 1st attempt at making an electric RS4 so it was nice to recycle it to a project that actually works
Anyways I also mounted all the electronics using double sided tape, and in the case of the caps I also ziptied those to the brace as the tape wasn't sticking too well to the heat shrink tube covering them.
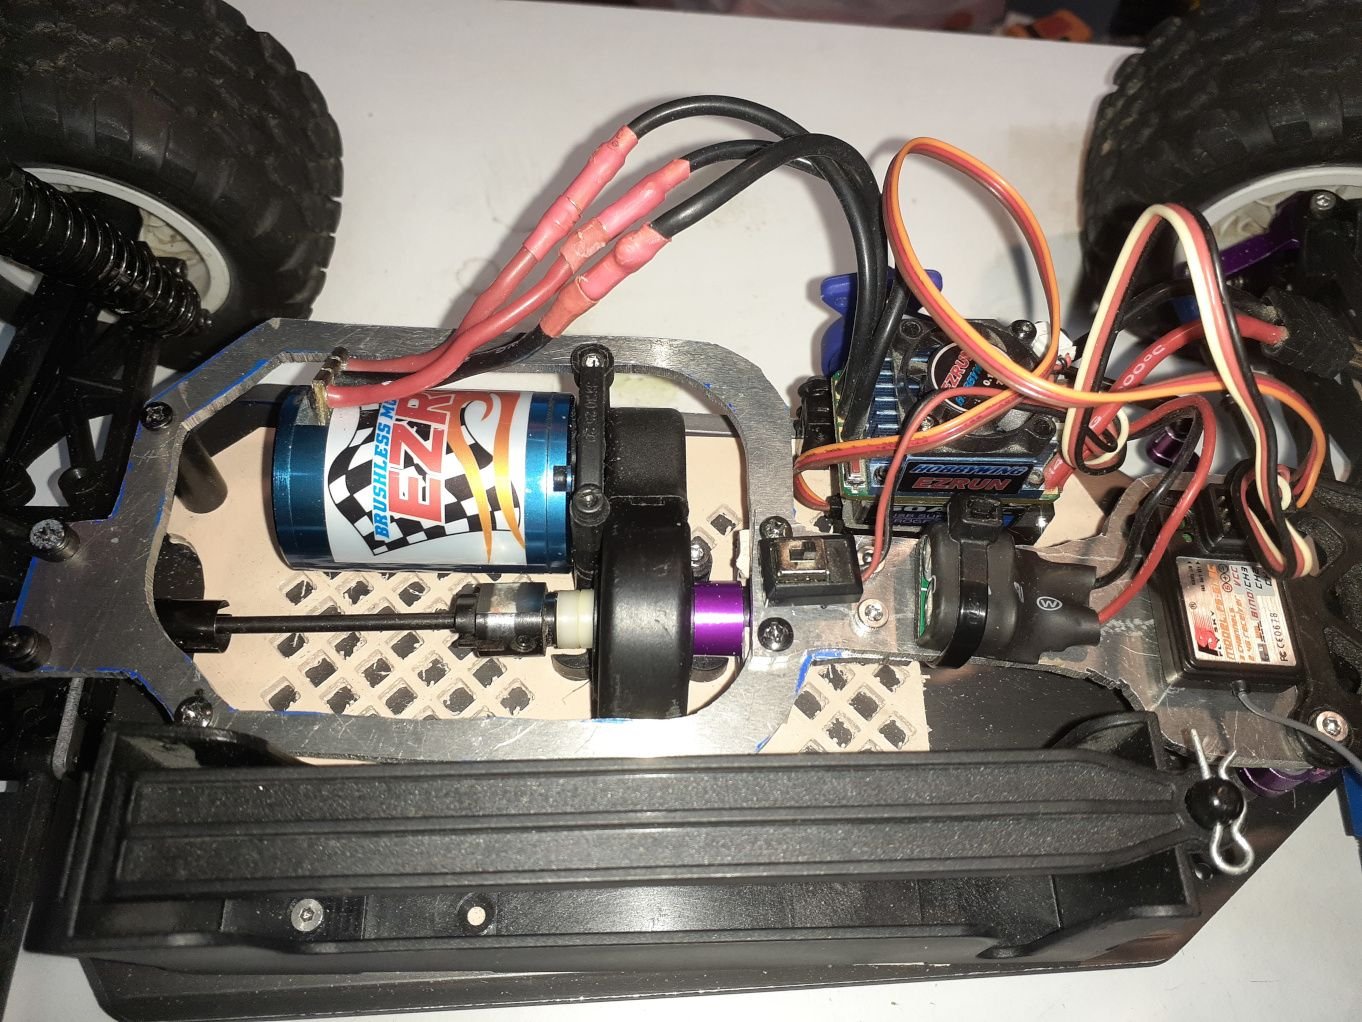
I'll take better pics when I run it to test the temps as I got a temp gun the other day. Weather has just been either raining, or sweltering hot, and humid >.>
The pede 4X4 I decided to keep a pede as I found I had a body that looks perfect on it when I pulled out the body I had for it when it was a slash. I designed, and 3d printed new body mounts so I didn't have to modify the body.
Anyways I basically finished the RS4 MT1 electric. there is one minor thing I forgot to make which is an antenna mount... I'll make it in a few minutes that should be pretty straight forward. Yesterday I 3d printed a 3mm chassis braces that went from the front to the back, but there was too much chassis flex so today I took them, traced them to a 3mm piece of scrap aluminum I had from a failed project, and cut it out on my bandsaw. Now it has absolutely zero flex. The aluminum piece was actually a chassis plate I made from my 1st attempt at making an electric RS4 so it was nice to recycle it to a project that actually works
Anyways I also mounted all the electronics using double sided tape, and in the case of the caps I also ziptied those to the brace as the tape wasn't sticking too well to the heat shrink tube covering them.
I'll take better pics when I run it to test the temps as I got a temp gun the other day. Weather has just been either raining, or sweltering hot, and humid >.>
The pede 4X4 I decided to keep a pede as I found I had a body that looks perfect on it when I pulled out the body I had for it when it was a slash. I designed, and 3d printed new body mounts so I didn't have to modify the body.
08-03-2024, 03:42 PM
#562
im aware. i said continuation of the RS4 MT because if HPI had done a third generation it probably would have wound up like the Bullet. can't remember my timeline is a little screwed up but i think Hot Bodies was a subsidiary of HPI at that time. although if that was the case why not call it RS4 MT3? the RS4 branding was a big deal, a new RS4 MT seems like it would have been a good thing.
08-03-2024, 05:03 PM
#563
Join Date: Jul 2007
Location: North West Indiana
Posts: 12,845
Likes: 0
Received 13 Likes
on
12 Posts
it was called the Hotbodies Lightning GT10 now that I think about it.
From what I can see it was originally released in 2005
the MT2 was released in 2003(can't find the MT1 release date, but from what I seen from a list of RC's in chronological order it was probably around 93)... it is a 2 year newer model then the MT2. I think HPI rebranded it the HPI Bullet in 2010 or so in some announcement. I remember I royally wanted the Bullet when HPI announced it, but it took them like 2-3 years to actually release it for sale it was released when I stopped buying a lot of RC's I remember, and I was like meh.
I remember reading the lightning gt10 was a completely bulletproof RC but weight a LOT in comparison to other RC's which killed its top speed.
Side note my pede has a set of HB Lightning GT10 rims, and tires on it as I bought a lot of stuff when HPI did a warehouse closeout sale for HB stuff. I also bought like 10 sets of 1/10th scale buggy tires, and like every useless bling bling rim design for a savage >.>
Also made the antenna mount for the electric converted MT used a piece of delrin rod to make it fast. I was going to design one and 3d print it, but was like hmm I will be done with it, and have it mounted already if I use delrin before I even finished exporting it from the cad software.
Last edited by SyCo_VeNoM; 08-03-2024 at 05:16 PM.
08-03-2024, 08:12 PM
#564
Join Date: Jul 2007
Location: North West Indiana
Posts: 12,845
Likes: 0
Received 13 Likes
on
12 Posts
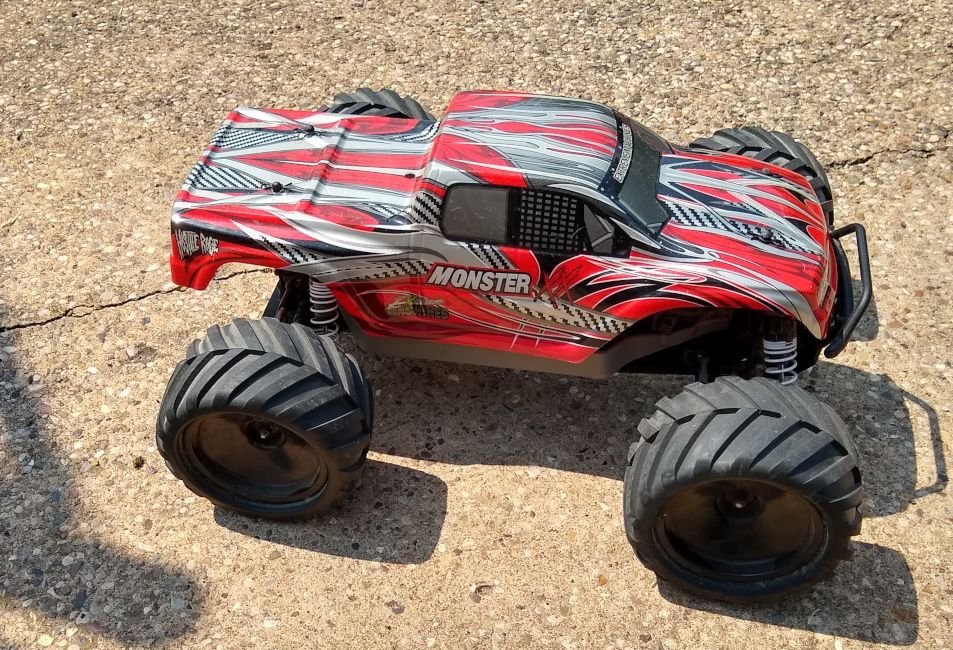
ohh This is my new project
Cram hobby quality RX, servo, and ESC into this thing.

Its a Redcat 1/24th scale Sumo Truggy
I gutted it years ago as it had some crappy all in one radio/servo controller/esc combo that was AM, with a proprietary 4 wire servo, and took 4 AA's. I tried to make it run on a 2S lipo(I actually did) with a new ESC, radio, and servo, but alas it was just held together temporarily with rubber bands..
That blue partial servo was a leftover of a gutted micro servo I put in it to just hold onto the servo piece that moves the steering as it was some weird proprietary design.
I still have the ESC, and lipo. I'll slap in a RX with a MG micro servo I have laying around after I design, and 3d print a tray to mount them to, where it failed the 1st time is as you can see there isn't a lot of real estate so all the electronics were on top of the main body making it unable to have a shell on it.
My plan is electronics on one side, and battery on other.
Honestly this should be quite easy as I already designed most of the tray in 10 mins
Cram hobby quality RX, servo, and ESC into this thing.
Its a Redcat 1/24th scale Sumo Truggy
I gutted it years ago as it had some crappy all in one radio/servo controller/esc combo that was AM, with a proprietary 4 wire servo, and took 4 AA's. I tried to make it run on a 2S lipo(I actually did) with a new ESC, radio, and servo, but alas it was just held together temporarily with rubber bands..
That blue partial servo was a leftover of a gutted micro servo I put in it to just hold onto the servo piece that moves the steering as it was some weird proprietary design.
I still have the ESC, and lipo. I'll slap in a RX with a MG micro servo I have laying around after I design, and 3d print a tray to mount them to, where it failed the 1st time is as you can see there isn't a lot of real estate so all the electronics were on top of the main body making it unable to have a shell on it.
My plan is electronics on one side, and battery on other.
Honestly this should be quite easy as I already designed most of the tray in 10 mins
08-04-2024, 10:47 AM
#566
Join Date: Jul 2007
Location: North West Indiana
Posts: 12,845
Likes: 0
Received 13 Likes
on
12 Posts
took the e-mt1 out today... constant problems. None of which are from the conversion
1st the screw that holds the motor down backed out a tiny bit making it lose the mesh
then the rear dogbone shot out
fixed those then the front left dogbone kept popping out when turning. I never figured out how to fix this on the MT line as it seems either it will pop out constantly, or be solid. I remember when I had the 3 MT1's, and 1 kept shooting dogbones on one side of it even though they were all set up identically.
Like I turn it all the way to the left, and right dogbone sits in cup fine run it and turn dogbone pops out, and binds the wheel.
wish there was cvd/s for this line of RC's I got some years back, but the ball is too big to fit in the diff cup.
Well anyways not sure if the ESC overheated, or hit the LVC(this is highly likely as I didn't charge it) as after 5-8 mins of running it shut down. The motor was at around 140ish degrees as the temp gun isn't the most accurate in where it is reading.
08-04-2024, 12:54 PM
#567
the old trick to keeping dogbones from popping out was to cut down springs from a ballpoint pen and put them in the outdrives and stub axles so they keep the bone centered with spring pressure. the spring will collapse when the suspension is compressed to avoid bottoming out but will keep the bone centered when the suspension is at right height or at full droop.
used to have that issue with my Kyosho Stadium Baja and read that trick in an old issue of RCCA Magazine. never popped another bone in that car.
another way iv seen done but never tried is to "shim" the inside of the stub axles and outdrives with a small thin slice of fuel tubing. it's the same idea. it "shims" the bone so it can't pop out but is compressible so it wont jamb anything up. the dogbone will have more end play with this method, but i guess it works.
Last edited by suburban_hooligan; 08-04-2024 at 01:00 PM.
08-04-2024, 04:50 PM
#568
Join Date: Jul 2007
Location: North West Indiana
Posts: 12,845
Likes: 0
Received 13 Likes
on
12 Posts
tried the shimming with the fuel tubing that is with it, prior the dogbone would just shoot out.
the fuel tubing idea is actually based on using small o-rings as some RC's included them to put in the cups.
The rears I could understand as I cut down the cups on the outdrives cause a failed experimental RC used them in prior the dogbones would bind hard due to hitting the cups as the dogbones were in it tight.
Made a topic for the redcat on the electric forum, and hit a issue with batteries as I basically finished everything else.Went through all of hobby kinds site, and found maybe 2-3 batteries that could potentially fit, but their mAH ratings are kinda low. Batteries I intended to use even if I cut the wrap, and just shove the plain cell there would be just a hair too big.
08-05-2024, 11:57 AM
#569
Join Date: Jul 2007
Location: North West Indiana
Posts: 12,845
Likes: 0
Received 13 Likes
on
12 Posts
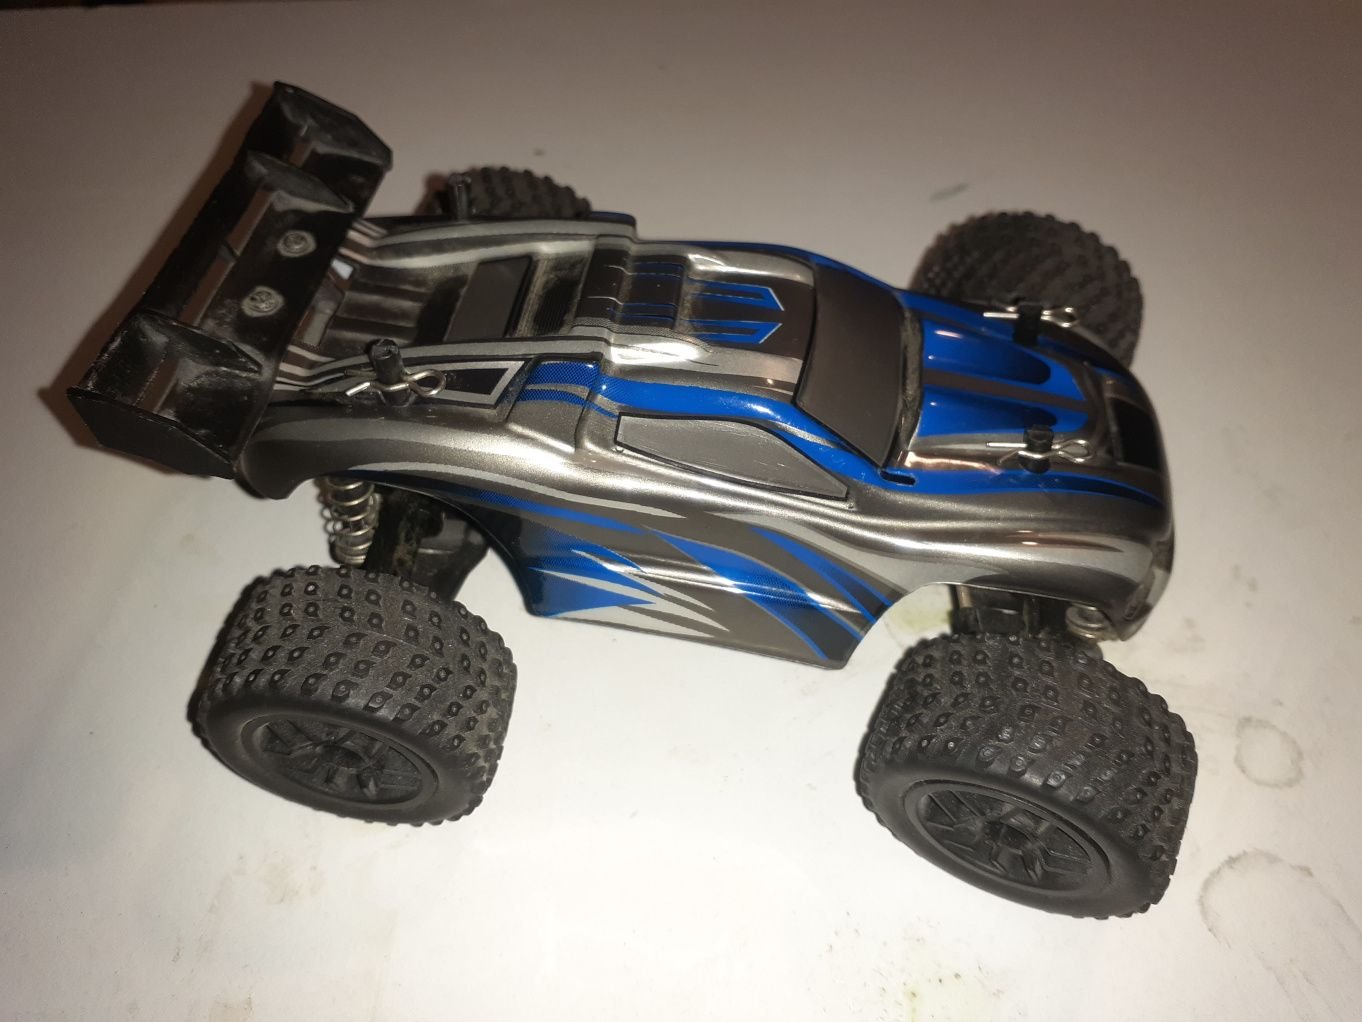
Well took the pede 4x4 out to run on freshly charged batteries
I like how that body looks on it I wish I knew what they ripped off. But even if I did it probably isn't made anymore
but anyways I really might have to make it back into a SCT though as the pede after 15 mins of running it, and 5 mins cooling off from me coming in the house, and knocking grass out of it the motor was at 145 degrees. I couldn't even touch it for a half a second while outside still. To be fair it was close to 100 degrees out, and in the direct sun which didn't help it's been brutally hot out this past week or so with extremely high humidity on top of the heat.
Anyways put a 1-2 inch crack on the side of the body from the 1st hit it took. Was going full speed, and used these paver bricks that are used as a border for pavement which have a smooth ramp like design to launch it 2-3 feet into the air, and it slammed into the birdbath in mid air which caused it to flip, and the body hit concrete. funny thing is it barely got scratched from the hit >.>
But eh what do I expect from a body that was on a $30 RC that literally cloned parts of multiple RC's
The pede is set up closer to a truggy with a center diff, and stadium truck tires on it
Edit: After writing that took my good ole brushless DF-02 out for the 1st time in 10-11 years I swear this is probably my favorite electric RC.
The run was cut short at 15 mins cause I drifted my buggy into a brick, and it hit the front left tire ripping the shock out. I also lost a screw that was holding my wing on from what I recall it was able to get 25-30 mins per charge on the battery.
No real damage though I just had to come in and replace the screws. I actually replaced the others on the shocks while I was at it as they were smaller then M3 screws, and were kinda loose in the holes pretty sure they were the ones that came with the shocks as m3's didn't want togo through the holes without some major force(and having to drill the one). I'm actually shocked they never fell out prior to be honest as I was able to undo them with my finger with no tools, but then again I think I only ran it 2 times since I put the metal shocks on it. The new ones I put in are going no where as they are also 50% longer, and extremely tight in there.
After 15 mins the motor was sitting at 130F so no worries about that, and that was with mostly full throttle runs on the driveway, an through grass where the stampede was mostly 40-50% throttle as it kept wanting to wheely, and was over 140F after 10 mins..
I like how that body looks on it I wish I knew what they ripped off. But even if I did it probably isn't made anymore
but anyways I really might have to make it back into a SCT though as the pede after 15 mins of running it, and 5 mins cooling off from me coming in the house, and knocking grass out of it the motor was at 145 degrees. I couldn't even touch it for a half a second while outside still. To be fair it was close to 100 degrees out, and in the direct sun which didn't help it's been brutally hot out this past week or so with extremely high humidity on top of the heat.
Anyways put a 1-2 inch crack on the side of the body from the 1st hit it took. Was going full speed, and used these paver bricks that are used as a border for pavement which have a smooth ramp like design to launch it 2-3 feet into the air, and it slammed into the birdbath in mid air which caused it to flip, and the body hit concrete. funny thing is it barely got scratched from the hit >.>
But eh what do I expect from a body that was on a $30 RC that literally cloned parts of multiple RC's
The pede is set up closer to a truggy with a center diff, and stadium truck tires on it
Edit: After writing that took my good ole brushless DF-02 out for the 1st time in 10-11 years I swear this is probably my favorite electric RC.
The run was cut short at 15 mins cause I drifted my buggy into a brick, and it hit the front left tire ripping the shock out. I also lost a screw that was holding my wing on from what I recall it was able to get 25-30 mins per charge on the battery
.No real damage though I just had to come in and replace the screws. I actually replaced the others on the shocks while I was at it as they were smaller then M3 screws, and were kinda loose in the holes pretty sure they were the ones that came with the shocks as m3's didn't want togo through the holes without some major force(and having to drill the one). I'm actually shocked they never fell out prior to be honest as I was able to undo them with my finger with no tools, but then again I think I only ran it 2 times since I put the metal shocks on it. The new ones I put in are going no where as they are also 50% longer, and extremely tight in there.
After 15 mins the motor was sitting at 130F so no worries about that, and that was with mostly full throttle runs on the driveway, an through grass where the stampede was mostly 40-50% throttle as it kept wanting to wheely, and was over 140F after 10 mins..
Last edited by SyCo_VeNoM; 08-05-2024 at 02:11 PM.
08-05-2024, 03:53 PM
#570
if the motor is that hot you need to drop the gearing. take a few teeth off the pinion. 20+ years ago i had to do that with my RC10T3, every summer id have to go from a 21 tooth to a 19 tooth pinion.
08-05-2024, 04:56 PM
#571
Join Date: Jul 2007
Location: North West Indiana
Posts: 12,845
Likes: 0
Received 13 Likes
on
12 Posts
well that is the problem it is running a 12t pinion already, and the motor can't move any closer to the spur, and a bigger spur can't fit in it as it is barely clearing the housing.
Smaller tires is pretty much the only way I can think of to lower the gearing as SCT tires are a bit over 20mm's smaller in diameter
Trying to see if there is a different center gear setup as supposedly the pede has a higher gearing. Only thing I can think of is there is a different housing that allows bigger spurs.
Last edited by SyCo_VeNoM; 08-05-2024 at 05:10 PM.
08-05-2024, 07:52 PM
#573
Join Date: Jul 2007
Location: North West Indiana
Posts: 12,845
Likes: 0
Received 13 Likes
on
12 Posts
I'll try slapping on the SCT tires, and see if that brings the temps down to usable levels before I do anything else. I ordered another set of wheel hex's as I had 14mm's on the pede. even if I don't use them on the pede in the future I still need them as a lot of the ones I have are in bad shape.
Worst comes to worst I use slightly smaller tires.
Weird I looked through a lot of my old posts, and I never mentioned it being too hot. I prolly ran it in 70ish degree weather, and not in 100ish degree weather
Now on the other hand I've been thinking of changing the e-mt's drive setup from the e10's to a custom designed 3d printed one so I could slap a bigger spur gear in it, and get better gearing options as that is running way too hot, and when I tested that it was like 15-20 degrees cooler then it was today. I would also make it easier to change the gearing where now I got to literally take the whole thing apart, and tighten it down. I was looking at how the pede 4X4 is done, and was like hmm that wouldn't be too hard to implement, and cut out of aluminum.
man wish there was a LHS nearby still there was a big one about 10 mins away, but the owner died, and it shut down a few years back
Last edited by SyCo_VeNoM; 08-05-2024 at 07:59 PM.
08-08-2024, 11:55 AM
#574
Join Date: Jul 2007
Location: North West Indiana
Posts: 12,845
Likes: 0
Received 13 Likes
on
12 Posts
So for the E-MT I said was done... no its not lol
I'm scrapping the work I already did, and starting anew basically from scratch.
Printing up a test piece for the spur. I got the zany idea to take the original MT1 spur gear, and cut all the teeth off, put it in a drill press, and press a piece of sandpaper to it while spinning to keep it balanced, and then take a 80 something tooth spur I had laying around(I think it was from a 2wd stampede) drill out the center, and then screw it into the MT1 spur gear.
I'm currently as of writing this 3d printing a new test spur holder based on the original MT1's design(kinda flipped though). Beyond giving me way more spur options, and making it drastically simpler to change the spur/pinion, and remove half the screws I used. No idea why this idea didn't dawn on me sooner. I only have yet to figure out the motor mount, but I'm leaning on a simple 2 screw slide it left, and right type mount that has 2 perpendicular horizontal .
I'm also going to have to remake the back chassis brace out of aluminum, but it is going to be a way simpler and stronger design as the one now the way it goes around the motor makes it so I can't actually change the gearing as it is right next to the motor, and allows no movement to increase the pinion size. Like right now I currently need to completely dismantle it as a screw backed out that holds the motor down under that big plate I made to hold the drive setup. This also will fix the issue is if I need a new spur as I can order pretty much any spur, and slap it in instead of having to try and track down a brama 10b spur, and hope the modification goes well to make it work I also most likely will be able to use bigger tires with the bigger spur
After that I will need a servo tray which should take like 5 mins to design as it literally is only 3 holes that need to line up on the chassis plate which are all in perfect a row..
Unlike the current setup where 12 screws have to line up that are staggered at all different points >.>
I'm scrapping the work I already did, and starting anew basically from scratch.
Printing up a test piece for the spur. I got the zany idea to take the original MT1 spur gear, and cut all the teeth off, put it in a drill press, and press a piece of sandpaper to it while spinning to keep it balanced, and then take a 80 something tooth spur I had laying around(I think it was from a 2wd stampede) drill out the center, and then screw it into the MT1 spur gear.
I'm currently as of writing this 3d printing a new test spur holder based on the original MT1's design(kinda flipped though). Beyond giving me way more spur options, and making it drastically simpler to change the spur/pinion, and remove half the screws I used. No idea why this idea didn't dawn on me sooner. I only have yet to figure out the motor mount, but I'm leaning on a simple 2 screw slide it left, and right type mount that has 2 perpendicular horizontal .
I'm also going to have to remake the back chassis brace out of aluminum, but it is going to be a way simpler and stronger design as the one now the way it goes around the motor makes it so I can't actually change the gearing as it is right next to the motor, and allows no movement to increase the pinion size. Like right now I currently need to completely dismantle it as a screw backed out that holds the motor down under that big plate I made to hold the drive setup. This also will fix the issue is if I need a new spur as I can order pretty much any spur, and slap it in instead of having to try and track down a brama 10b spur, and hope the modification goes well to make it work
I also most likely will be able to use bigger tires with the bigger spur After that I will need a servo tray which should take like 5 mins to design as it literally is only 3 holes that need to line up on the chassis plate which are all in perfect a row..
Unlike the current setup where 12 screws have to line up that are staggered at all different points >.>
Last edited by SyCo_VeNoM; 08-08-2024 at 12:01 PM.
08-08-2024, 04:30 PM
#575
can't remember if i mentioned it yet, but im building a stadium truck with as many aftermarket parts as possible. so far it only has 3 OEM parts (4 if you count the front axles separate) it's mostly RPM stuff. i will only refer to it as a "generic stadium truck". but anyway it's almost a roller. just need to figure out what's gong on with the gearbox. really don't want to put an OEM diff in it, but i don't like how i had to modify the bearing to make the Drag Race Concepts diff fit. i also need to fab up a shaft for the idler gear. but yeah, it's getting close.

