


3d Printed FN5 turrets for filming out from in flight
 06-15-2020, 05:27 AM
#1
I've just completed a pair of model FN5 turrets at 1:3.7 scale for a Wellington Ic, The turrets are built from 3d printed SLS nylon, largely screwed together with M1 or M1.6 machine screws, and virtually no glue. This allowed the builds to be backed out of without damage if I needed to change the sequence. This proved a happy decision, adding detail as well as flexibility in assembly. I found that SLS nylon will readily accept a hand-tapped M1 thread into a 0.8mm drilled pilot hole. There are hundreds, if not more than a thousand such holes in each turret, it was more like building a watch than a turret! The most useful tool in my workshop is a cocktail-stick with a small ball of blutak, perfect for teasing M1 nuts onto threads or starting machine screws into threaded holes.
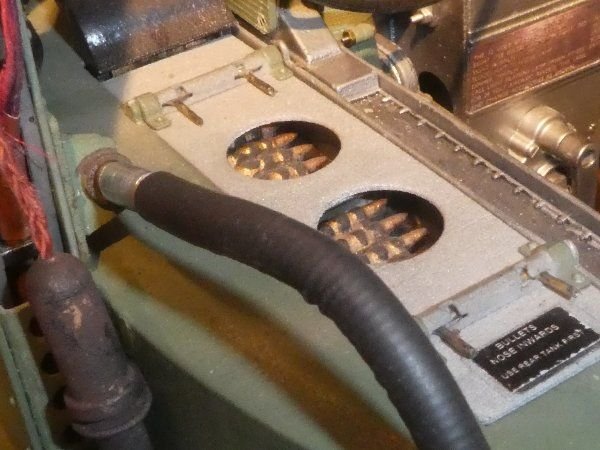
The turrets are designed to be filmed out from, and took 5 years to research, draw and build, although I could now build a pair of turrets in, I think, under 6 months. The hard work was on the CAD side, as I learned Fusion 360 during the course of the project. There were 3 colour schemes in use for such turrets. Early turrets were unpainted, then as manufacture caught up with demand there was a short period where they were painted British Interior Green, wherafter the normal all-black scheme was adopted. I've gone with the green scheme, as the more light inside the turret, the greater the photographic depth of field will exist. As it will be optimal if both turret interior and outside world will be in focus, this will help. The turrets have all working lamps, collimating gunsights, traverse and pneumatically operated elevation, as well as extensive modelling of every switch, circuit breaker, transformer, .303 rounds and hand-dyed period wiring. The rounds in the feed-chutes were individually made and assembled into belts, using a cosmetic link on the viewable side, with a concealed link underneath linking the rounds temporarily until they could be glue into their twisting and curving path within the chutes - which saved having to draw them as a single belt! If anyone would like a similar turret, perhaps in a different scale, weight or level of complexity, I'd be happy to build further ones, although reduction is scale from 1:3.7 may involve changes to build method, mechanical complexity and so forth. Price would be heavily dependant on scale.
One of the difficulties with these was that there are no extant technical drawings, and such plan and side elevation assembly drawings as exist contain numerous errors which had to be corrected. In some cases, these errors were caught late, for example the overly high central console, and the doors. These have been corrected on my master drawings, but remain errors on my built turrets as they were impractical or too expensive, to correct. You may amuse yourselves finding more! One of the hardest aspects was ensuring all moving parts missed each other, whilst also missing the underside of the cupola, which was designed with minimal clearance. Also the front windows are complex-curvatures, and so making these accurately involved considerable efforts to produce a vac-form which looked correct, fitted the internal cupola structure and also allowed moving parts to just miss the underside of the cupola.The next phase is to solve several problems in converting extruded alloy channel into correctly curved geodetic channel (I am utterly hopeless at woodwork!) and produce the internal fittings required to make the joints. So production of the fuselage will likely not commence for a couple of years now.
The latest film of the now completed turrets is linked below this paragraph, but there are many earlier films under the videos tab on my youtube channel. As I was learning to use a video camera, and had no idea about video editing, some of these are a bit repetitive/dull, as it was something I was doing for a few family and friends really. I can recommend the films "moving rams" and "new MK III gunsight" as well as some of the ones covering production of the vac-forming tool.I'm very happy to try and answer questions, or learn of errors. Many thanks to Mark Evans, who provided some component drawings, to Stoney CNC who milled the baseplates, and to Tim Noack who built the gunsight's innards.
I'm very happy to take questions, here and/or on youtube.

A real FN5 on a Wellington
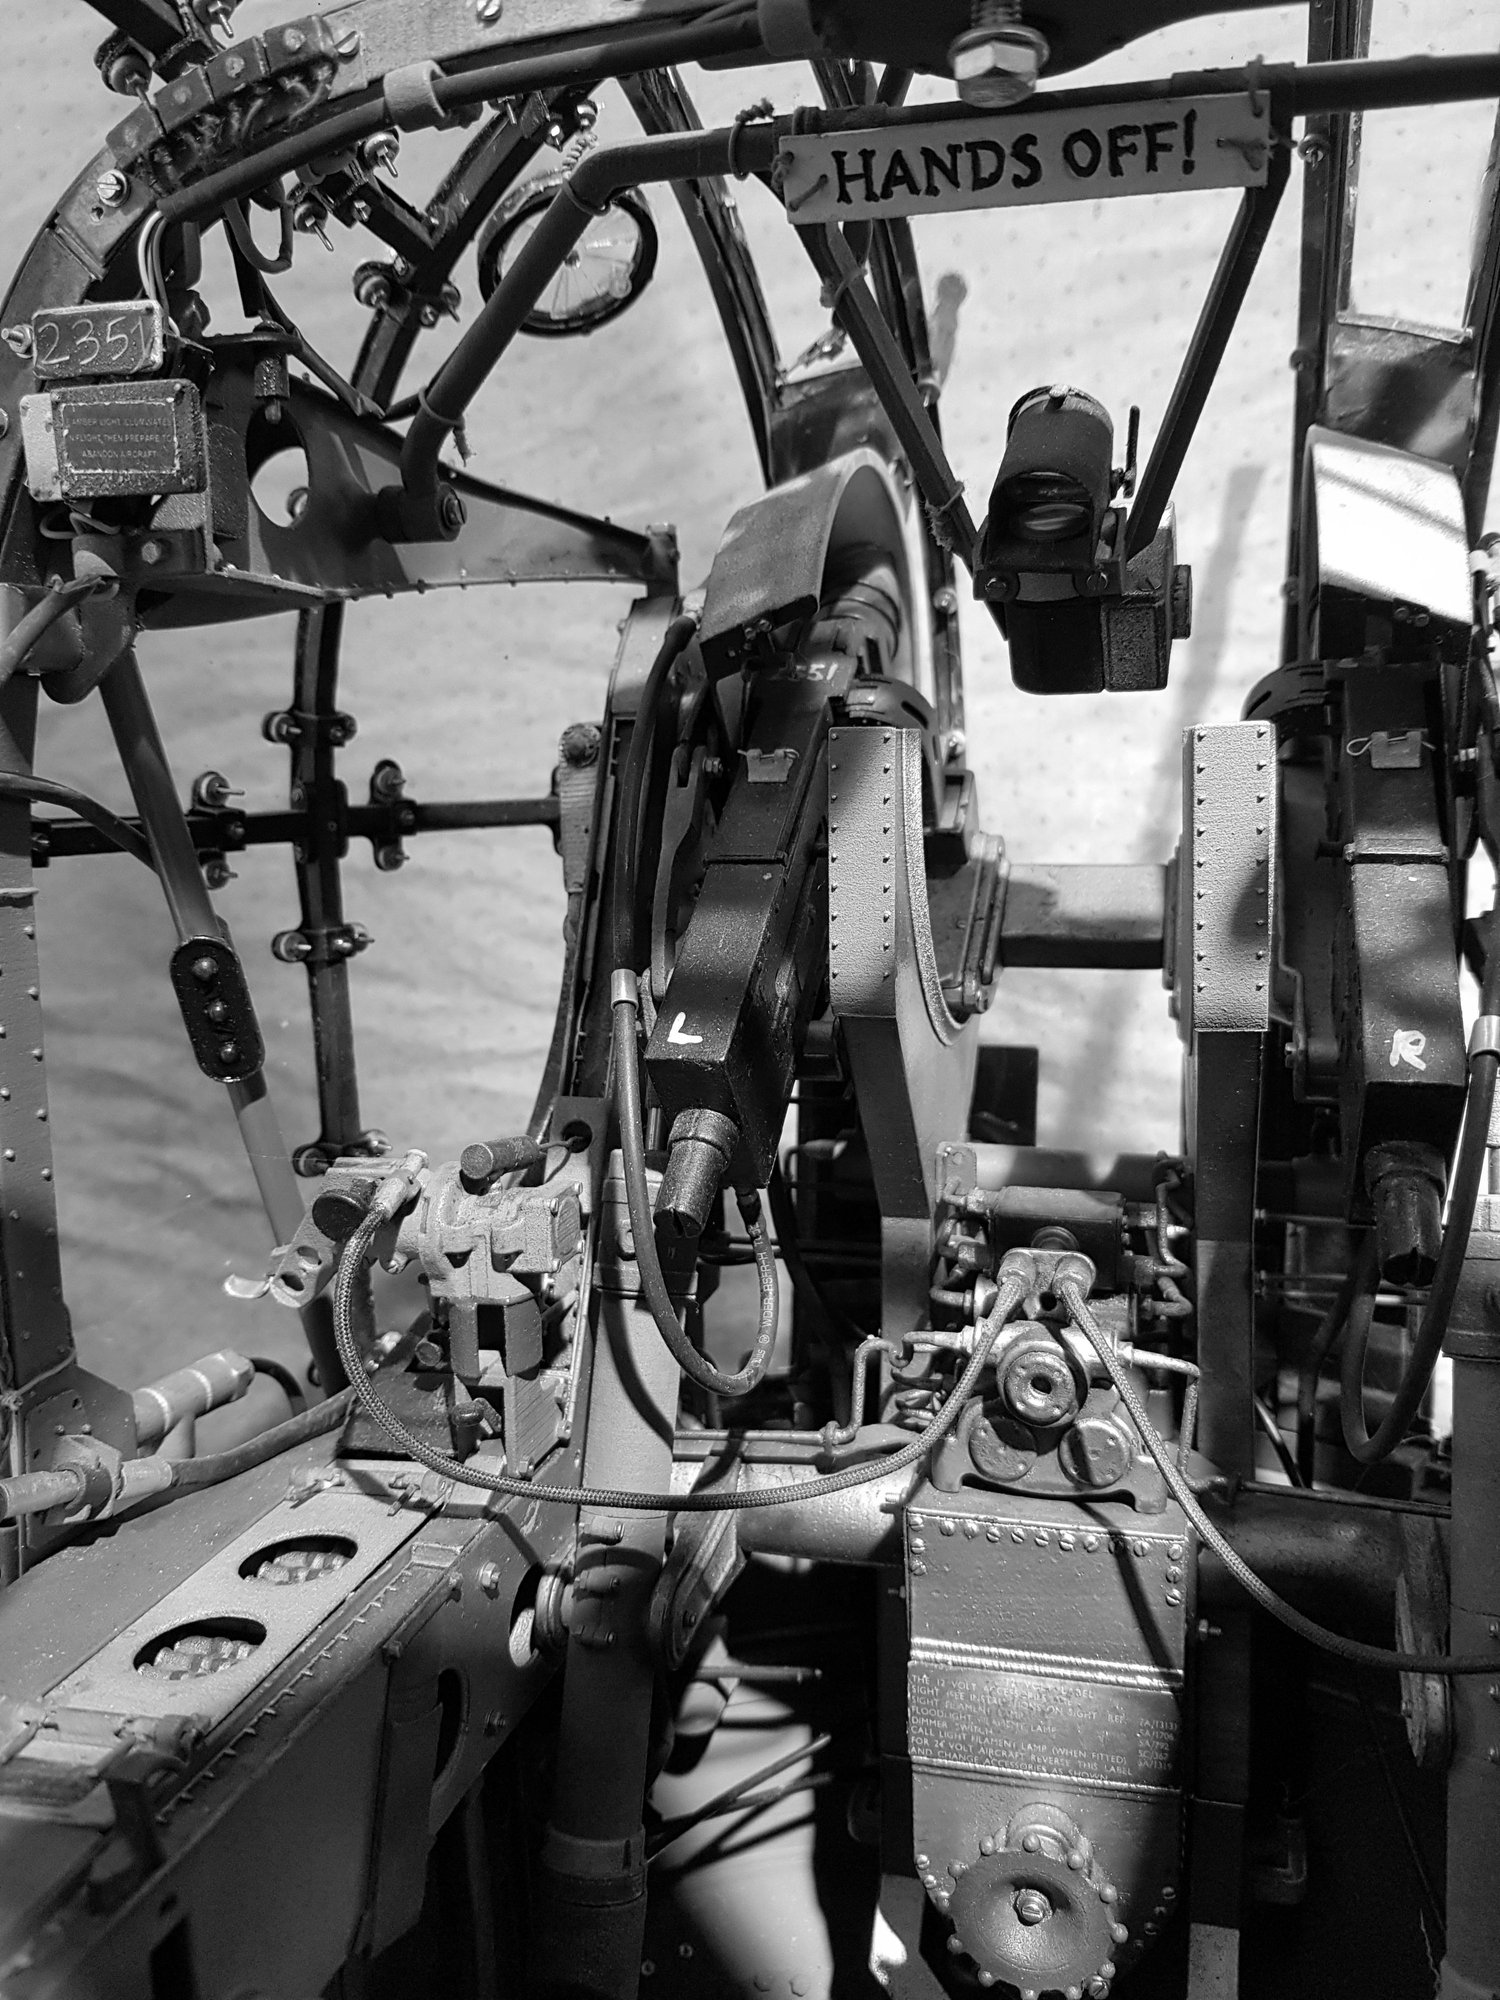
My model from similar angle in B/W
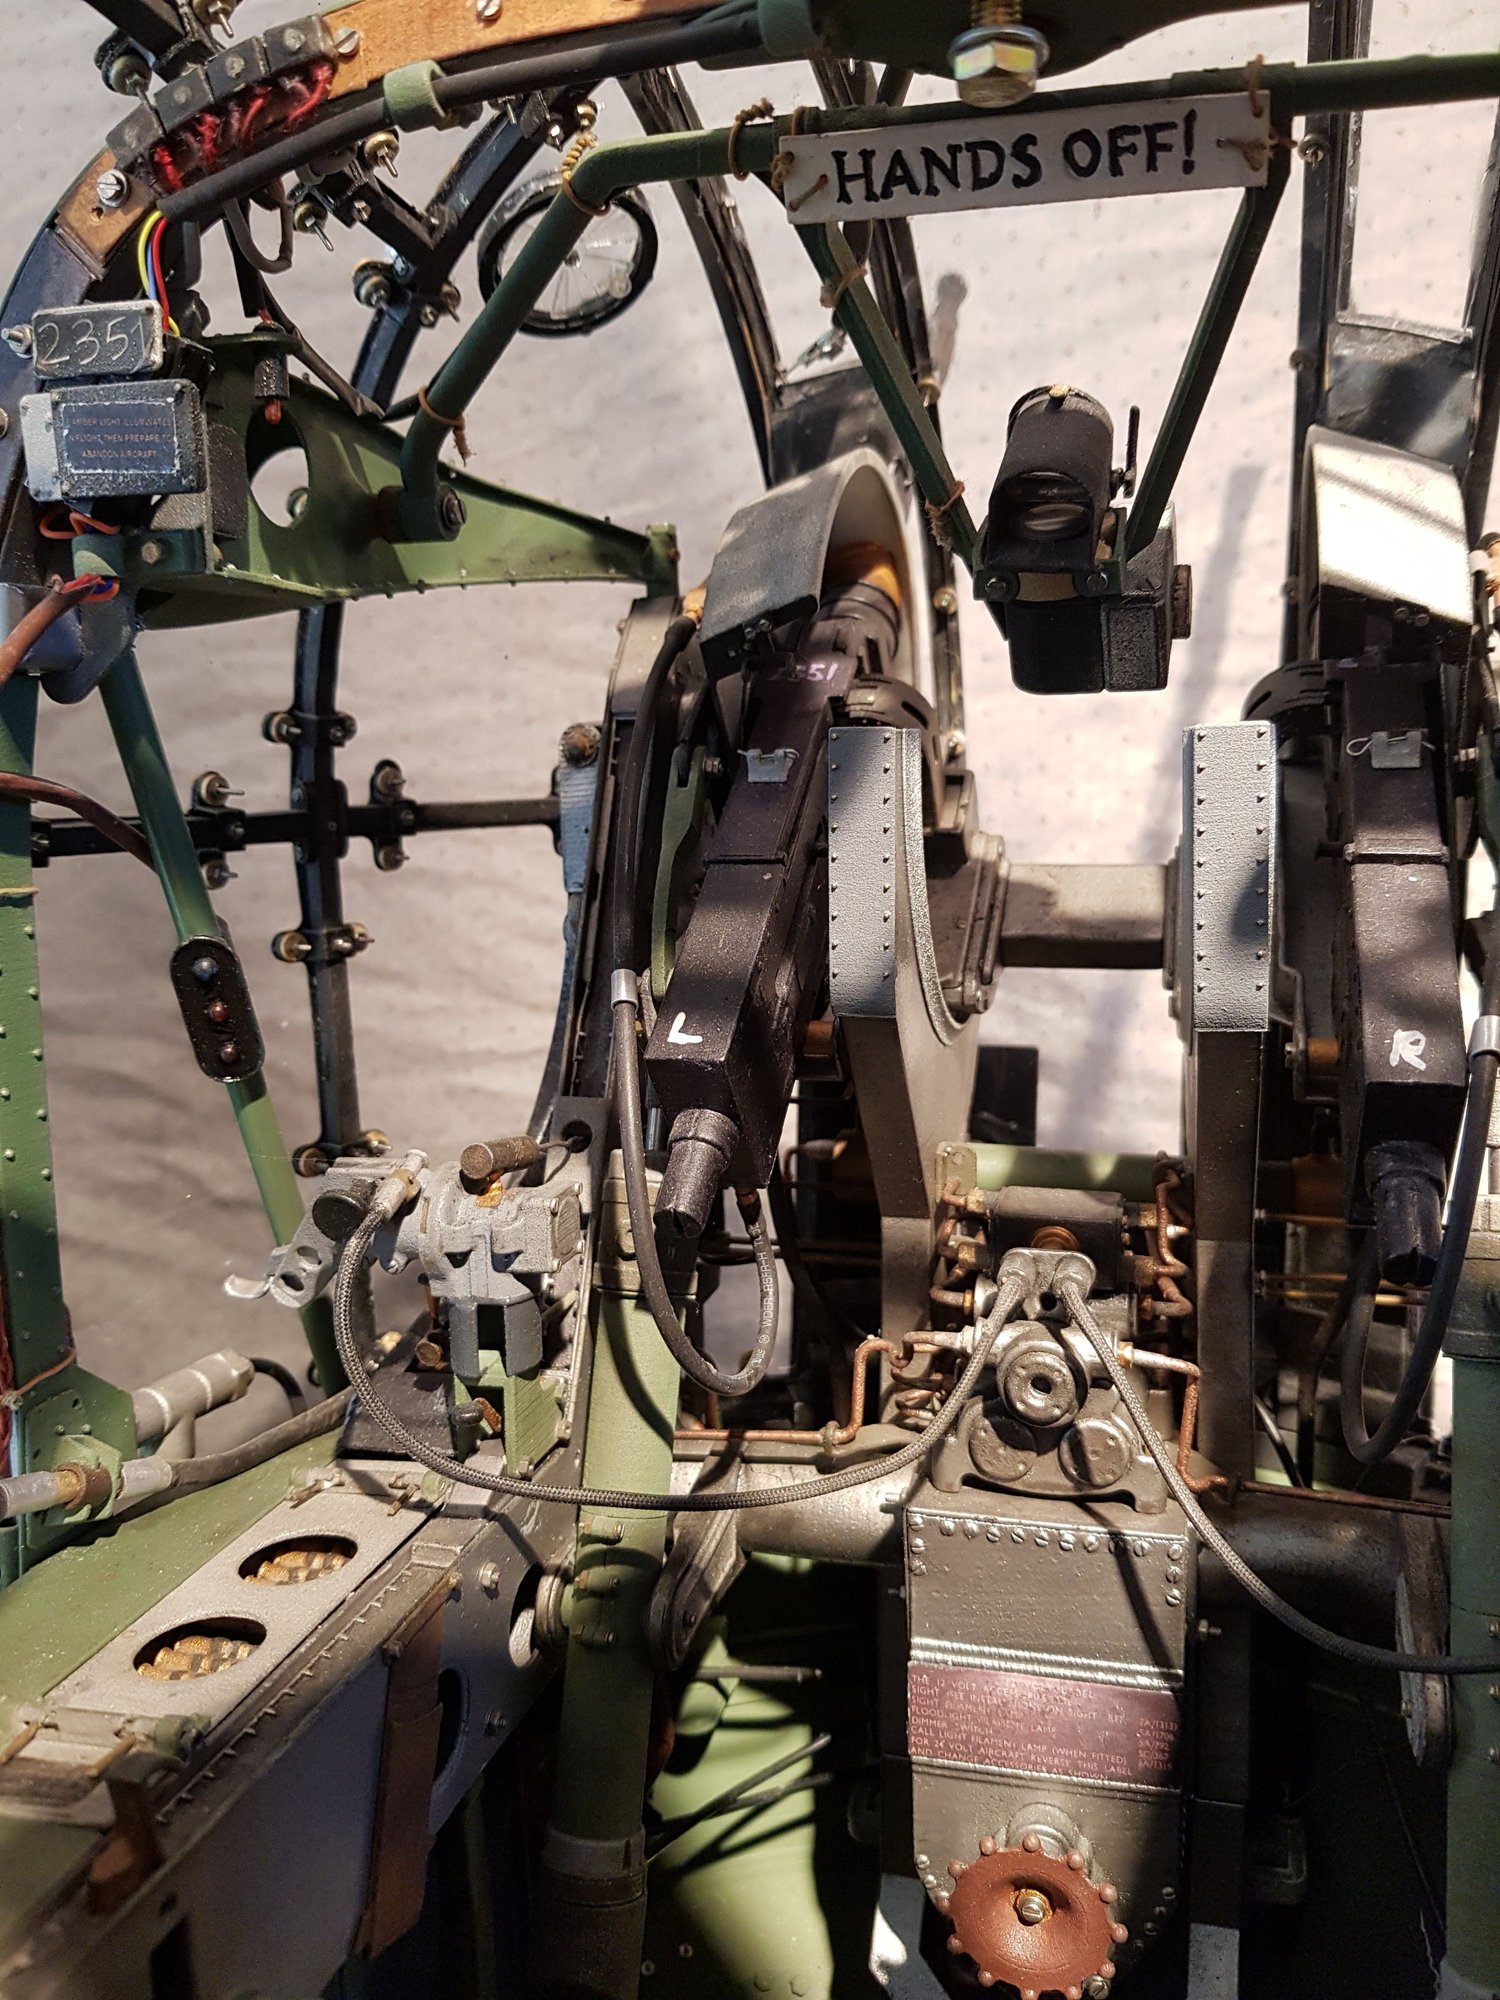
Ditto in colour, with early-war green scheme
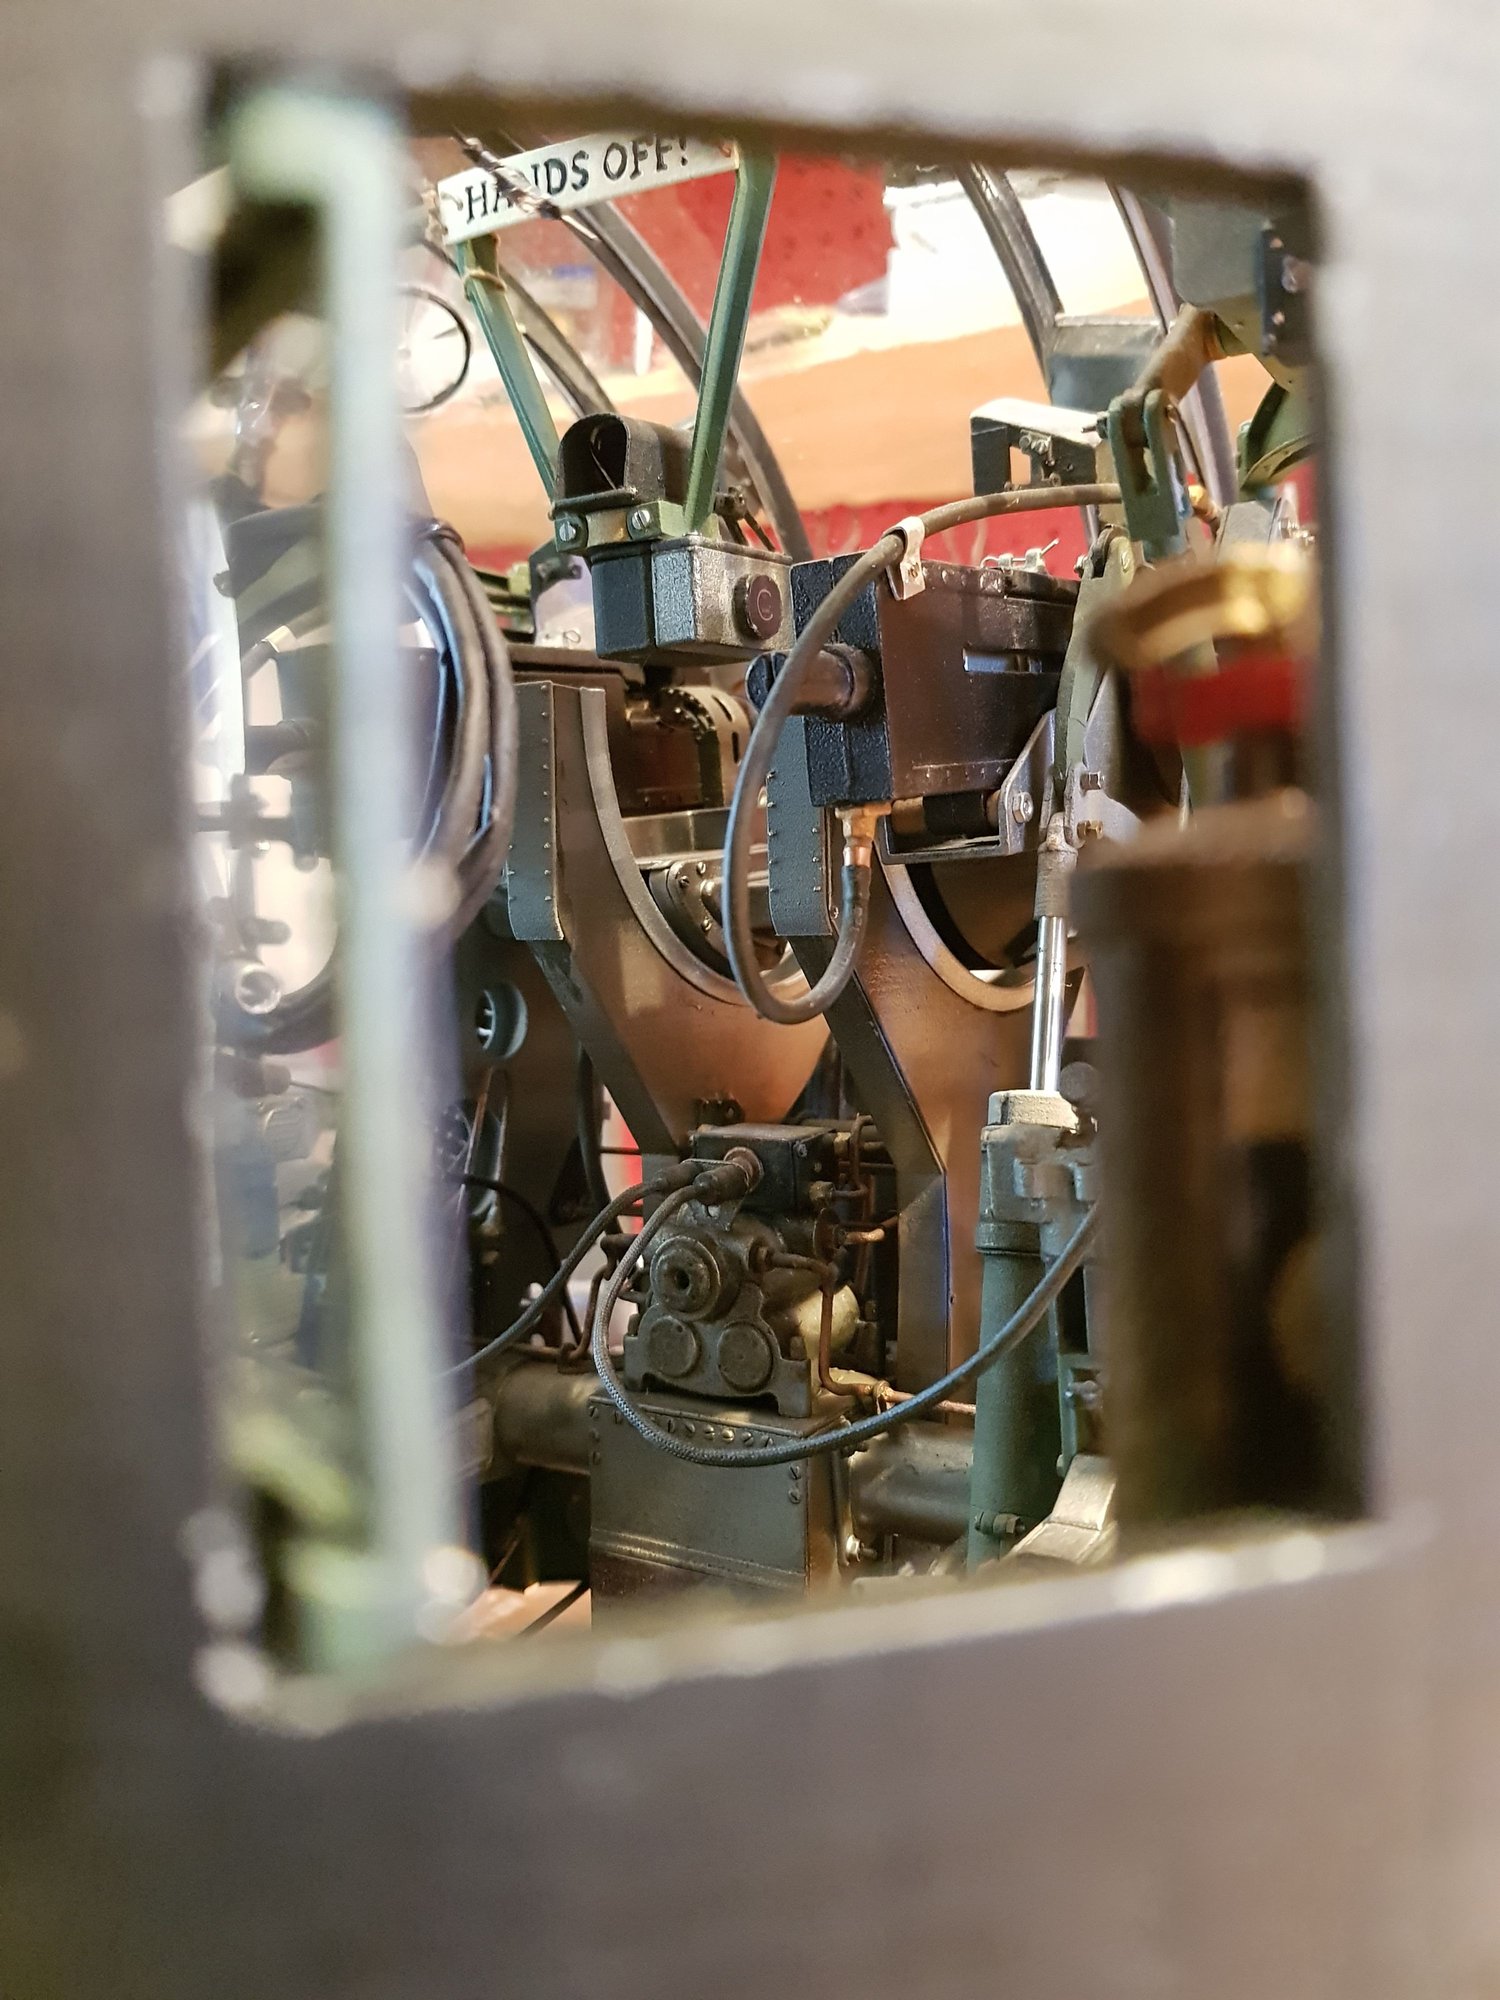
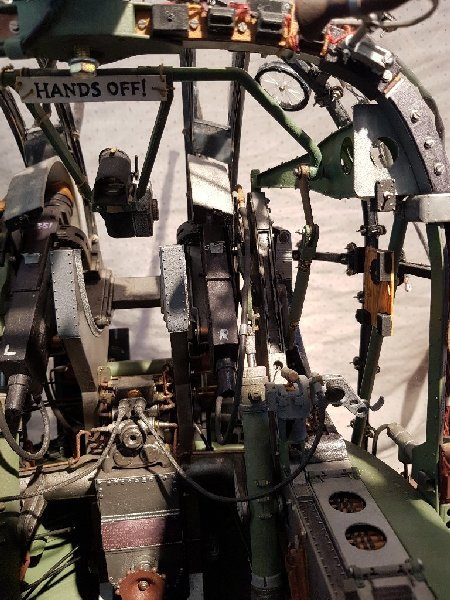
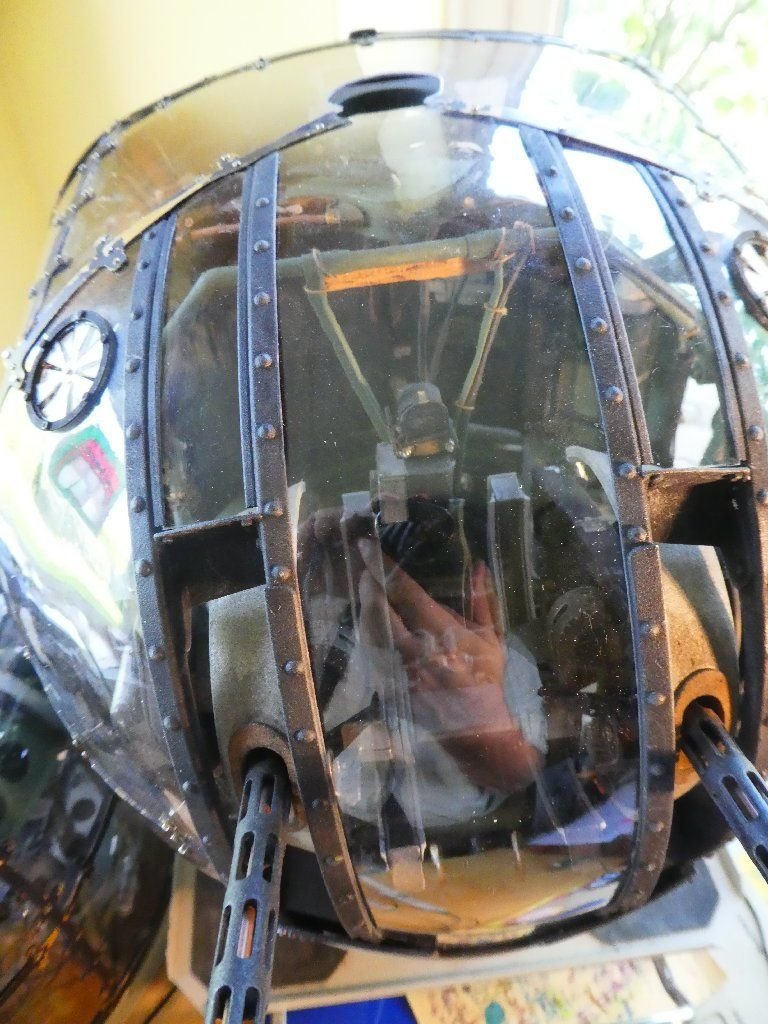
View into front turret through access hatch
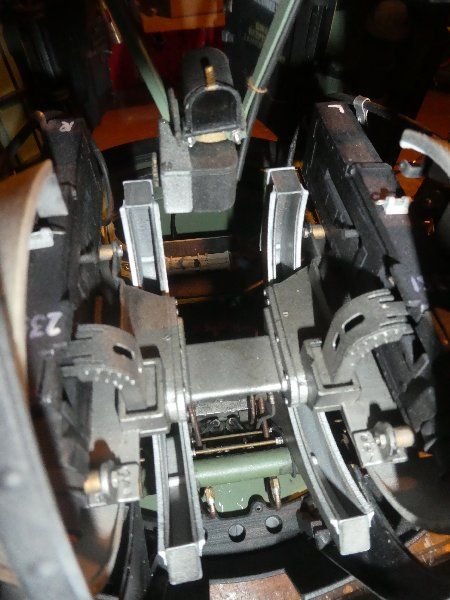
Rear turret
Rear turret
Rear turret seat and lap strap
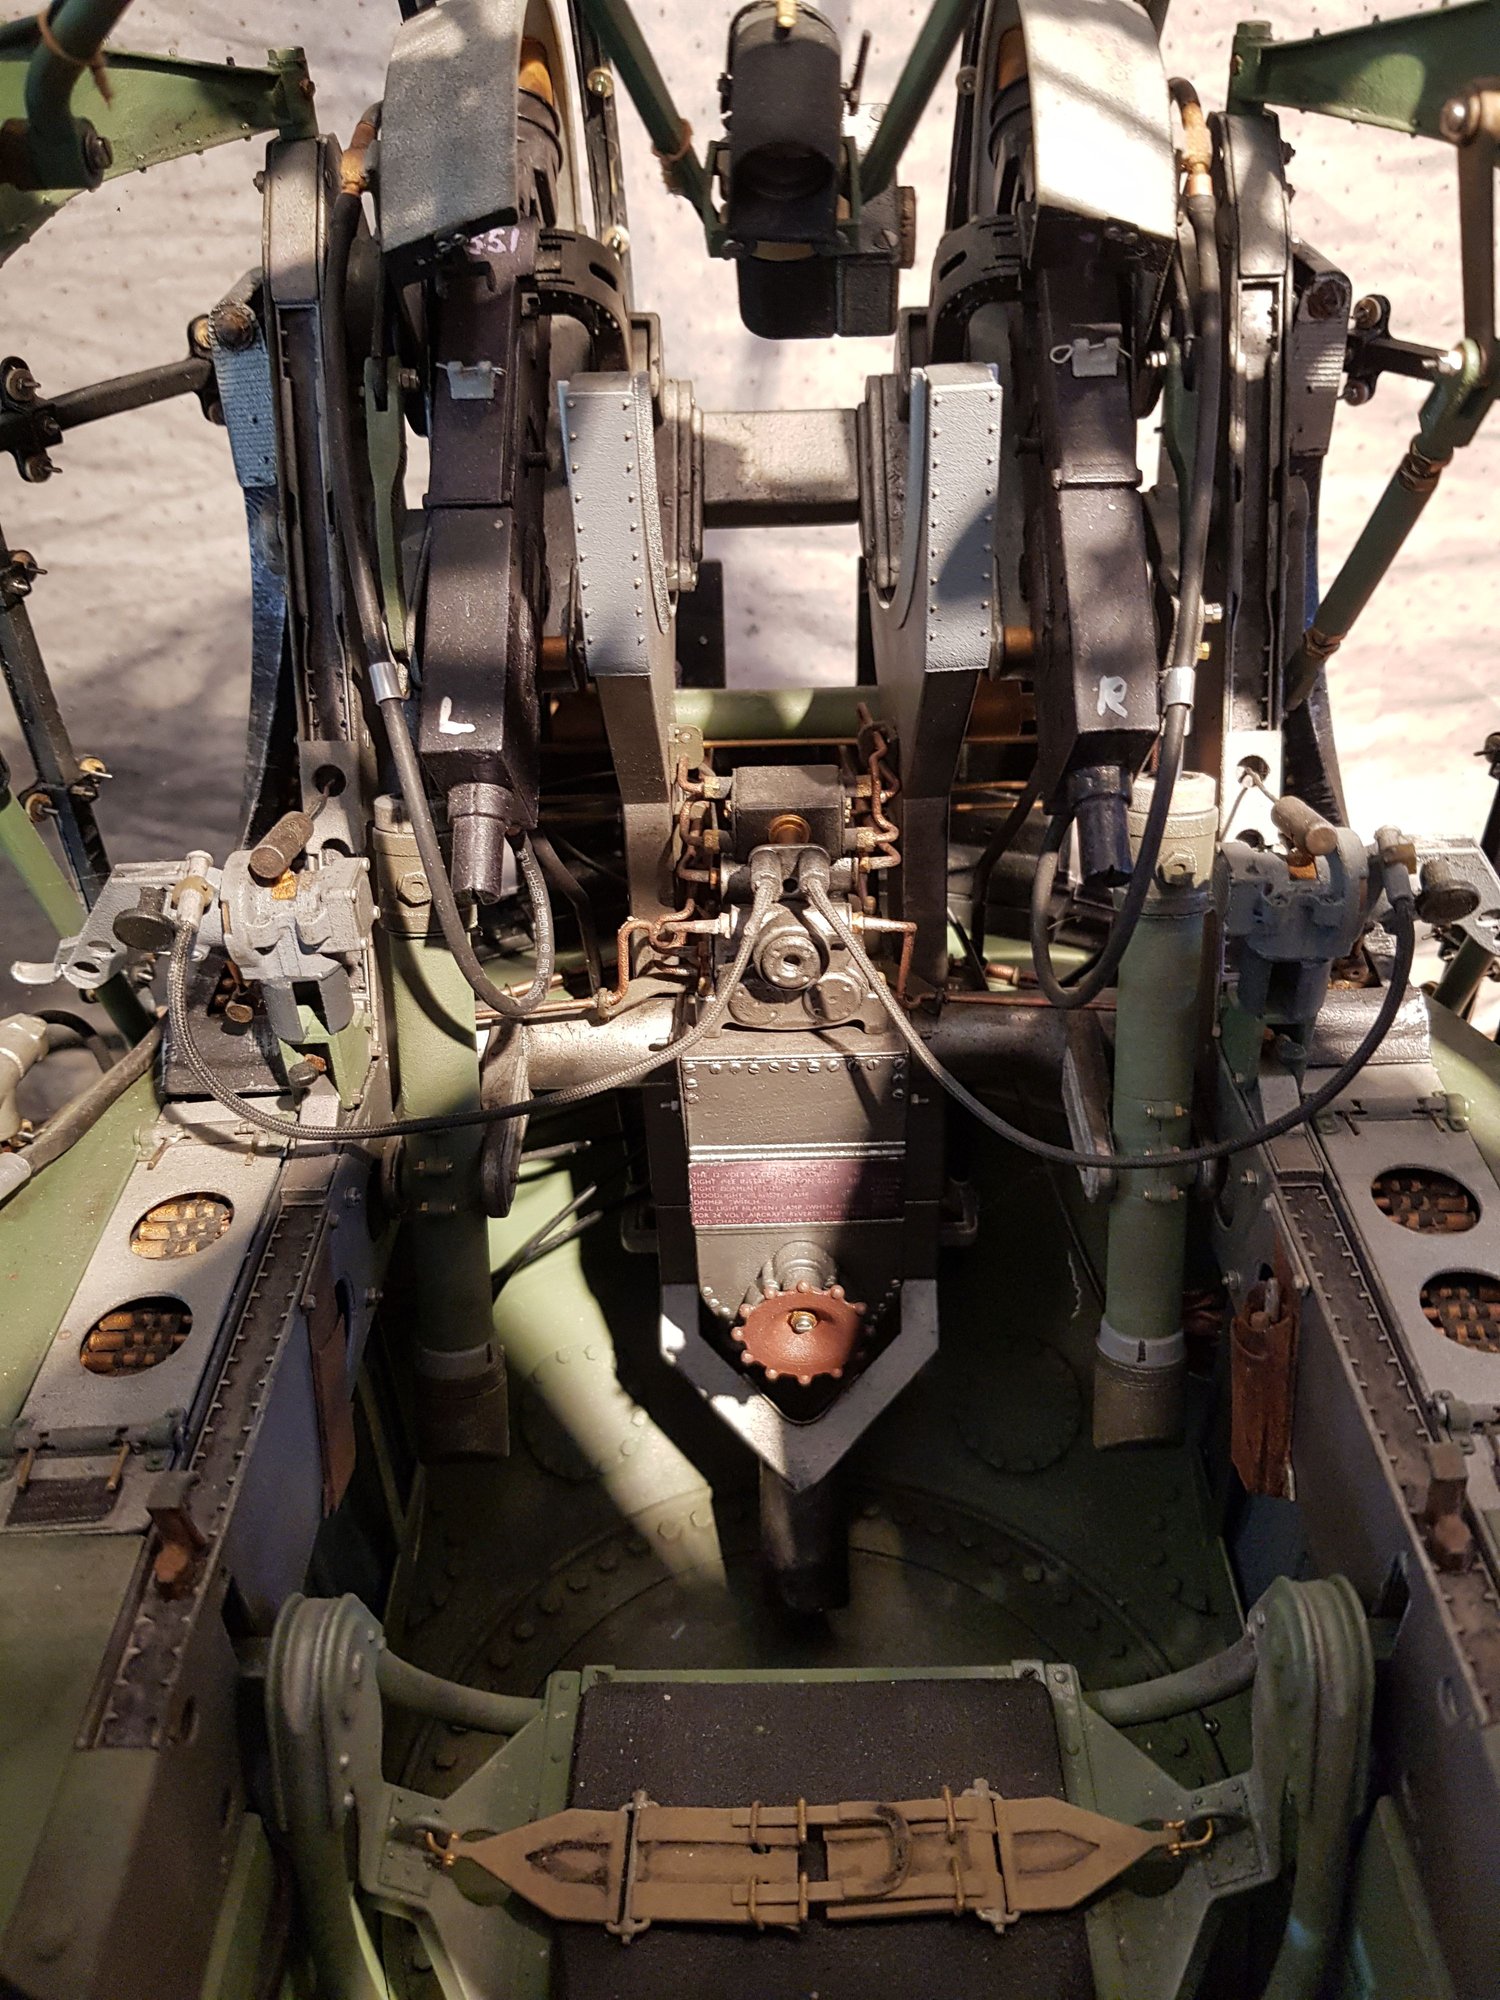
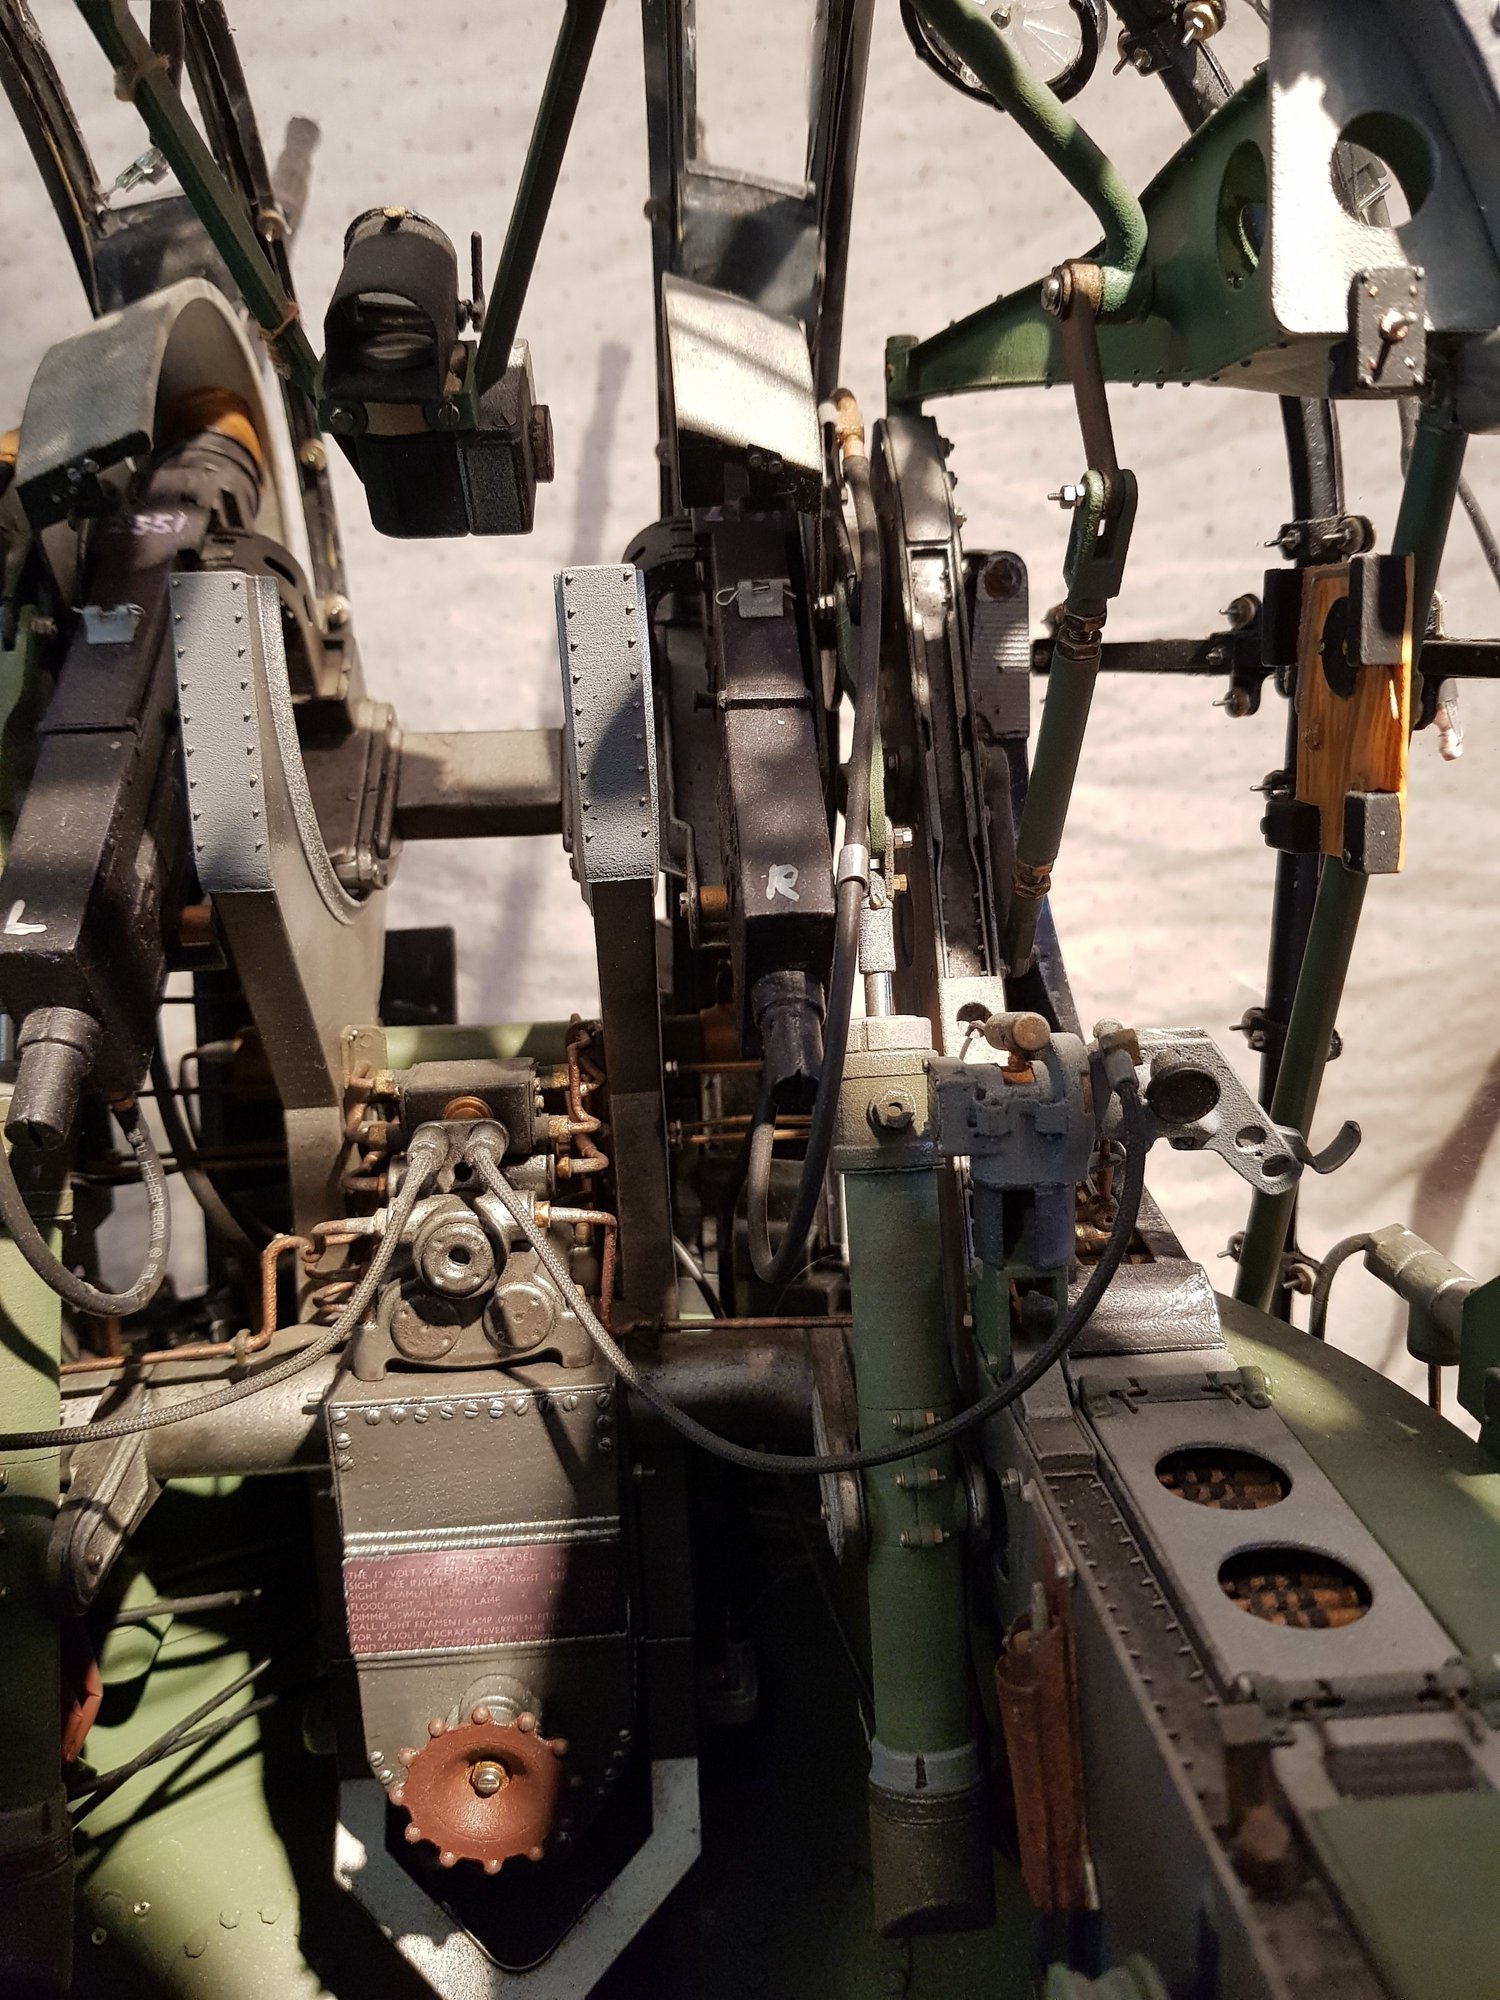
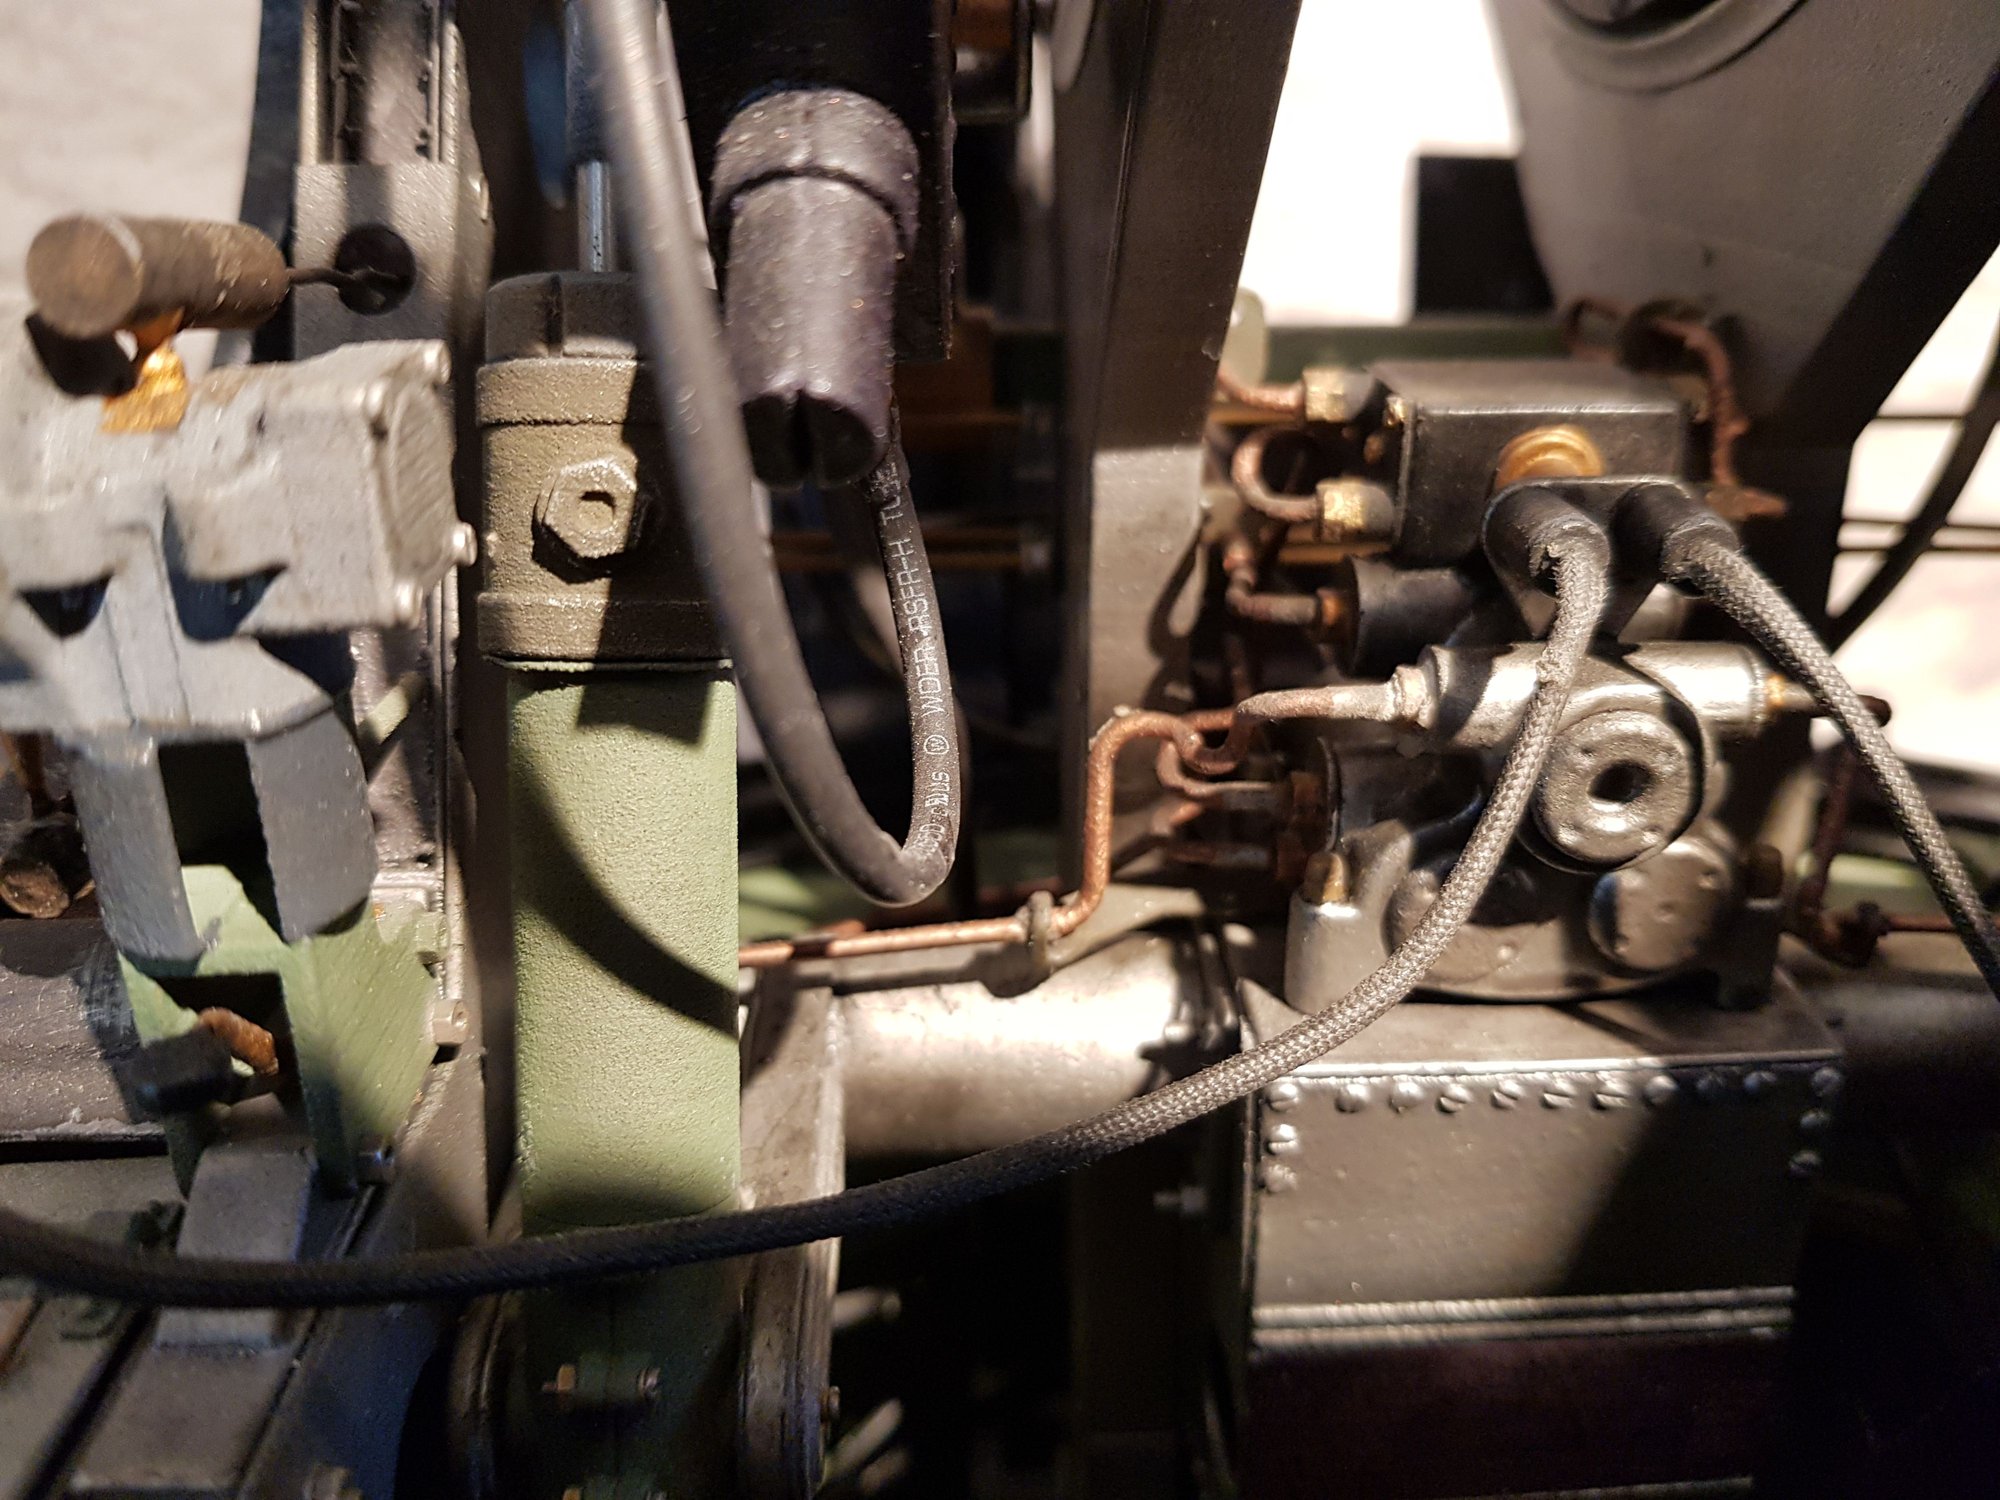
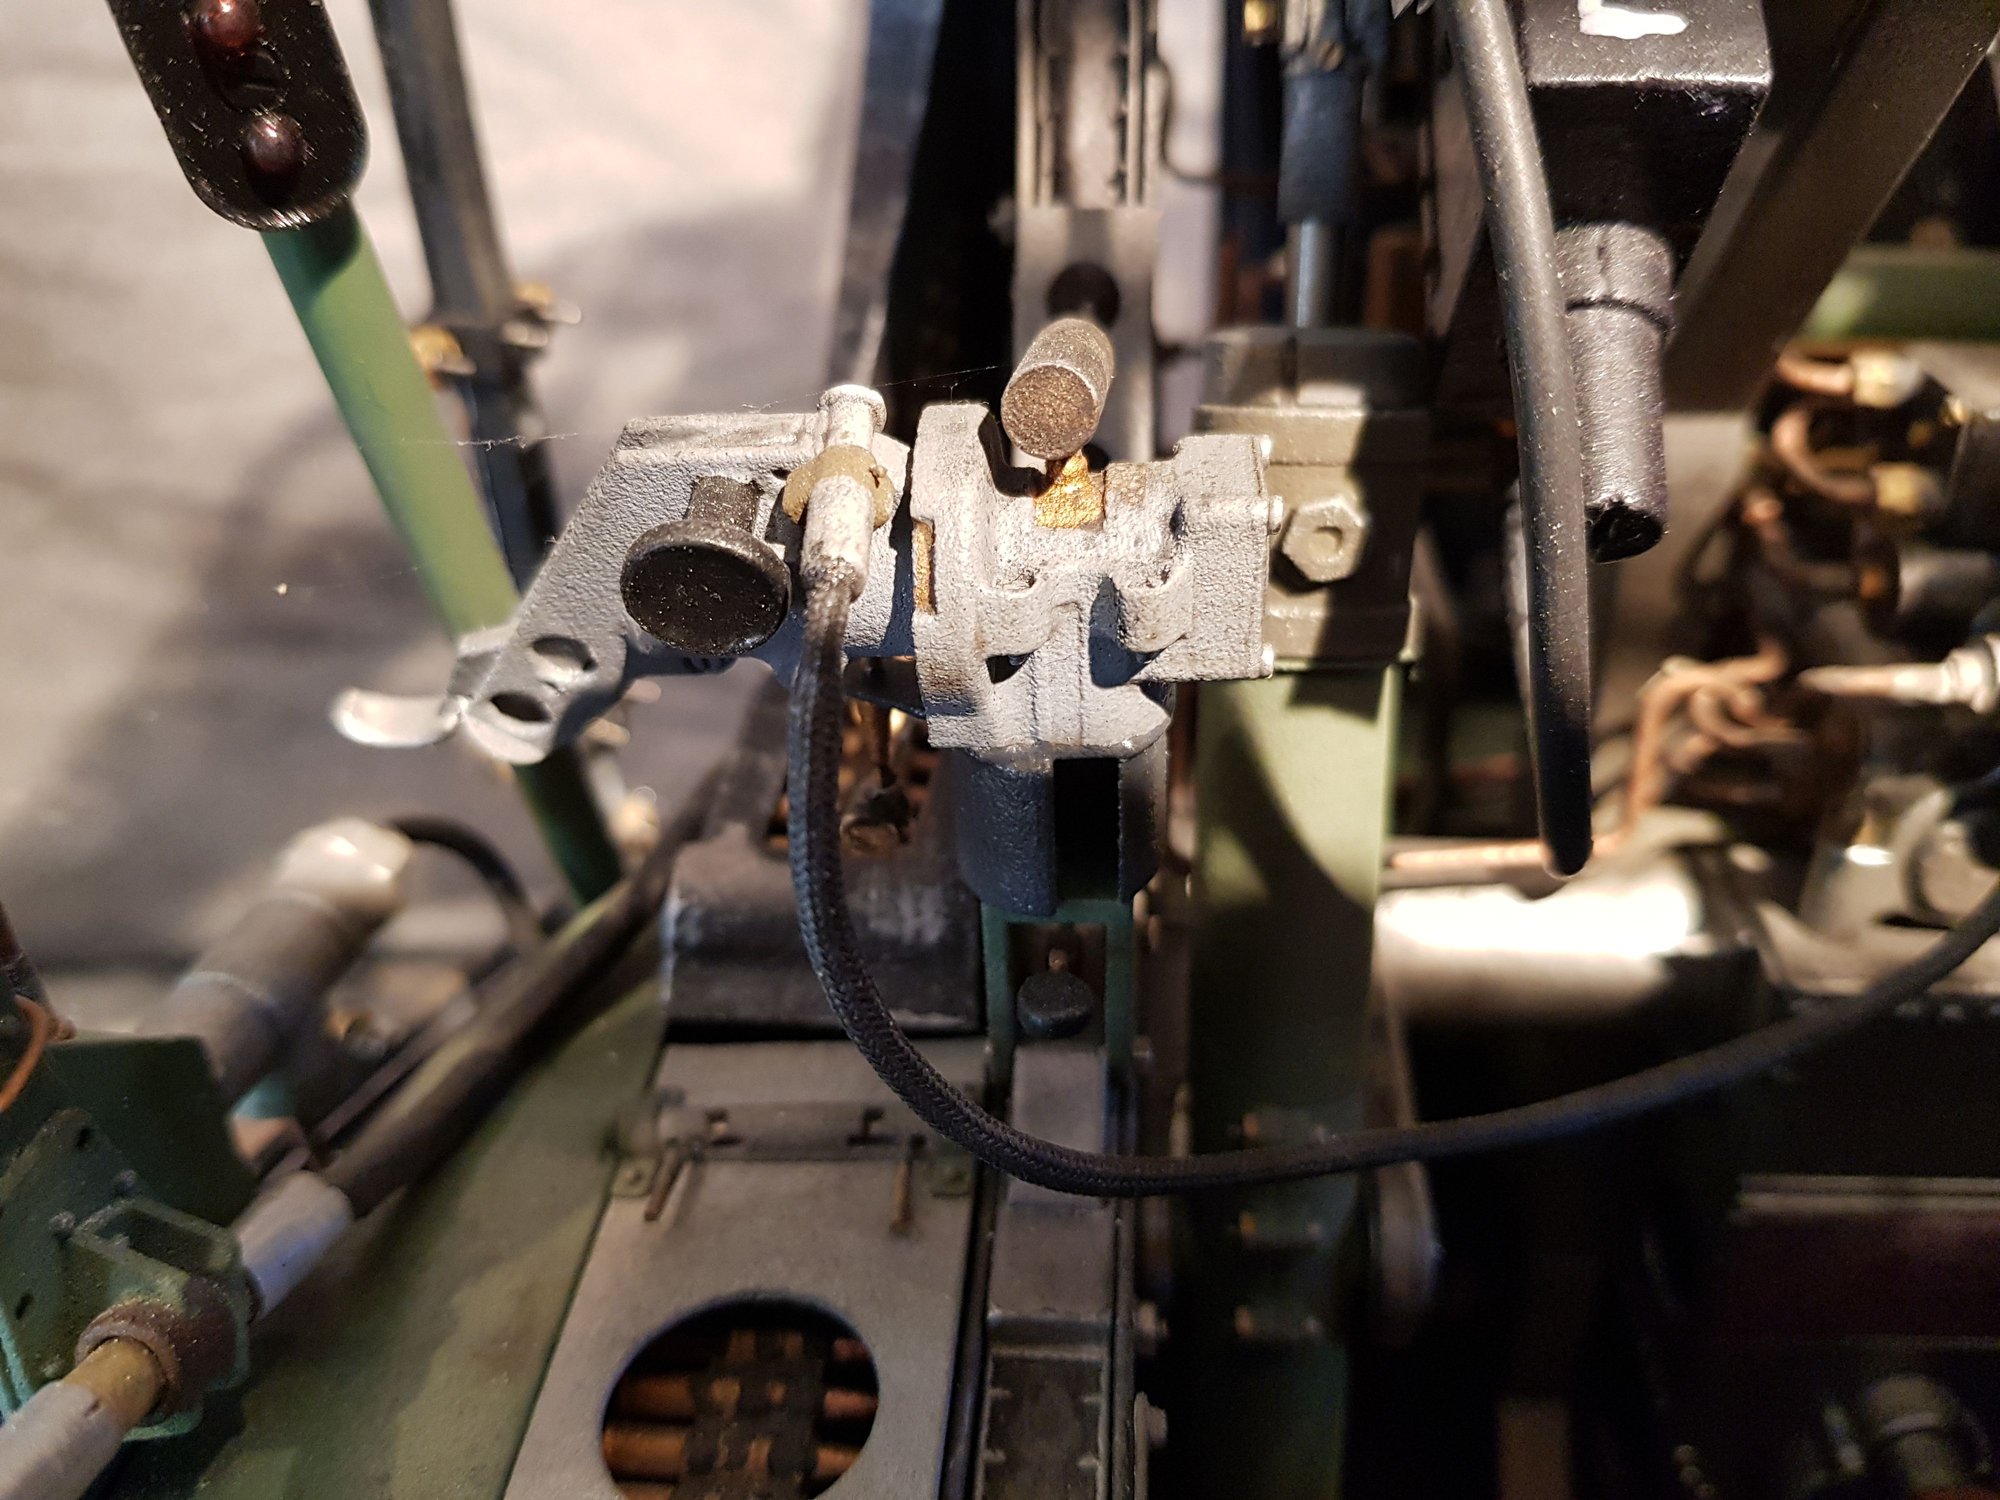
Rear turret view of hydraulic stack and piping
General view of front turret
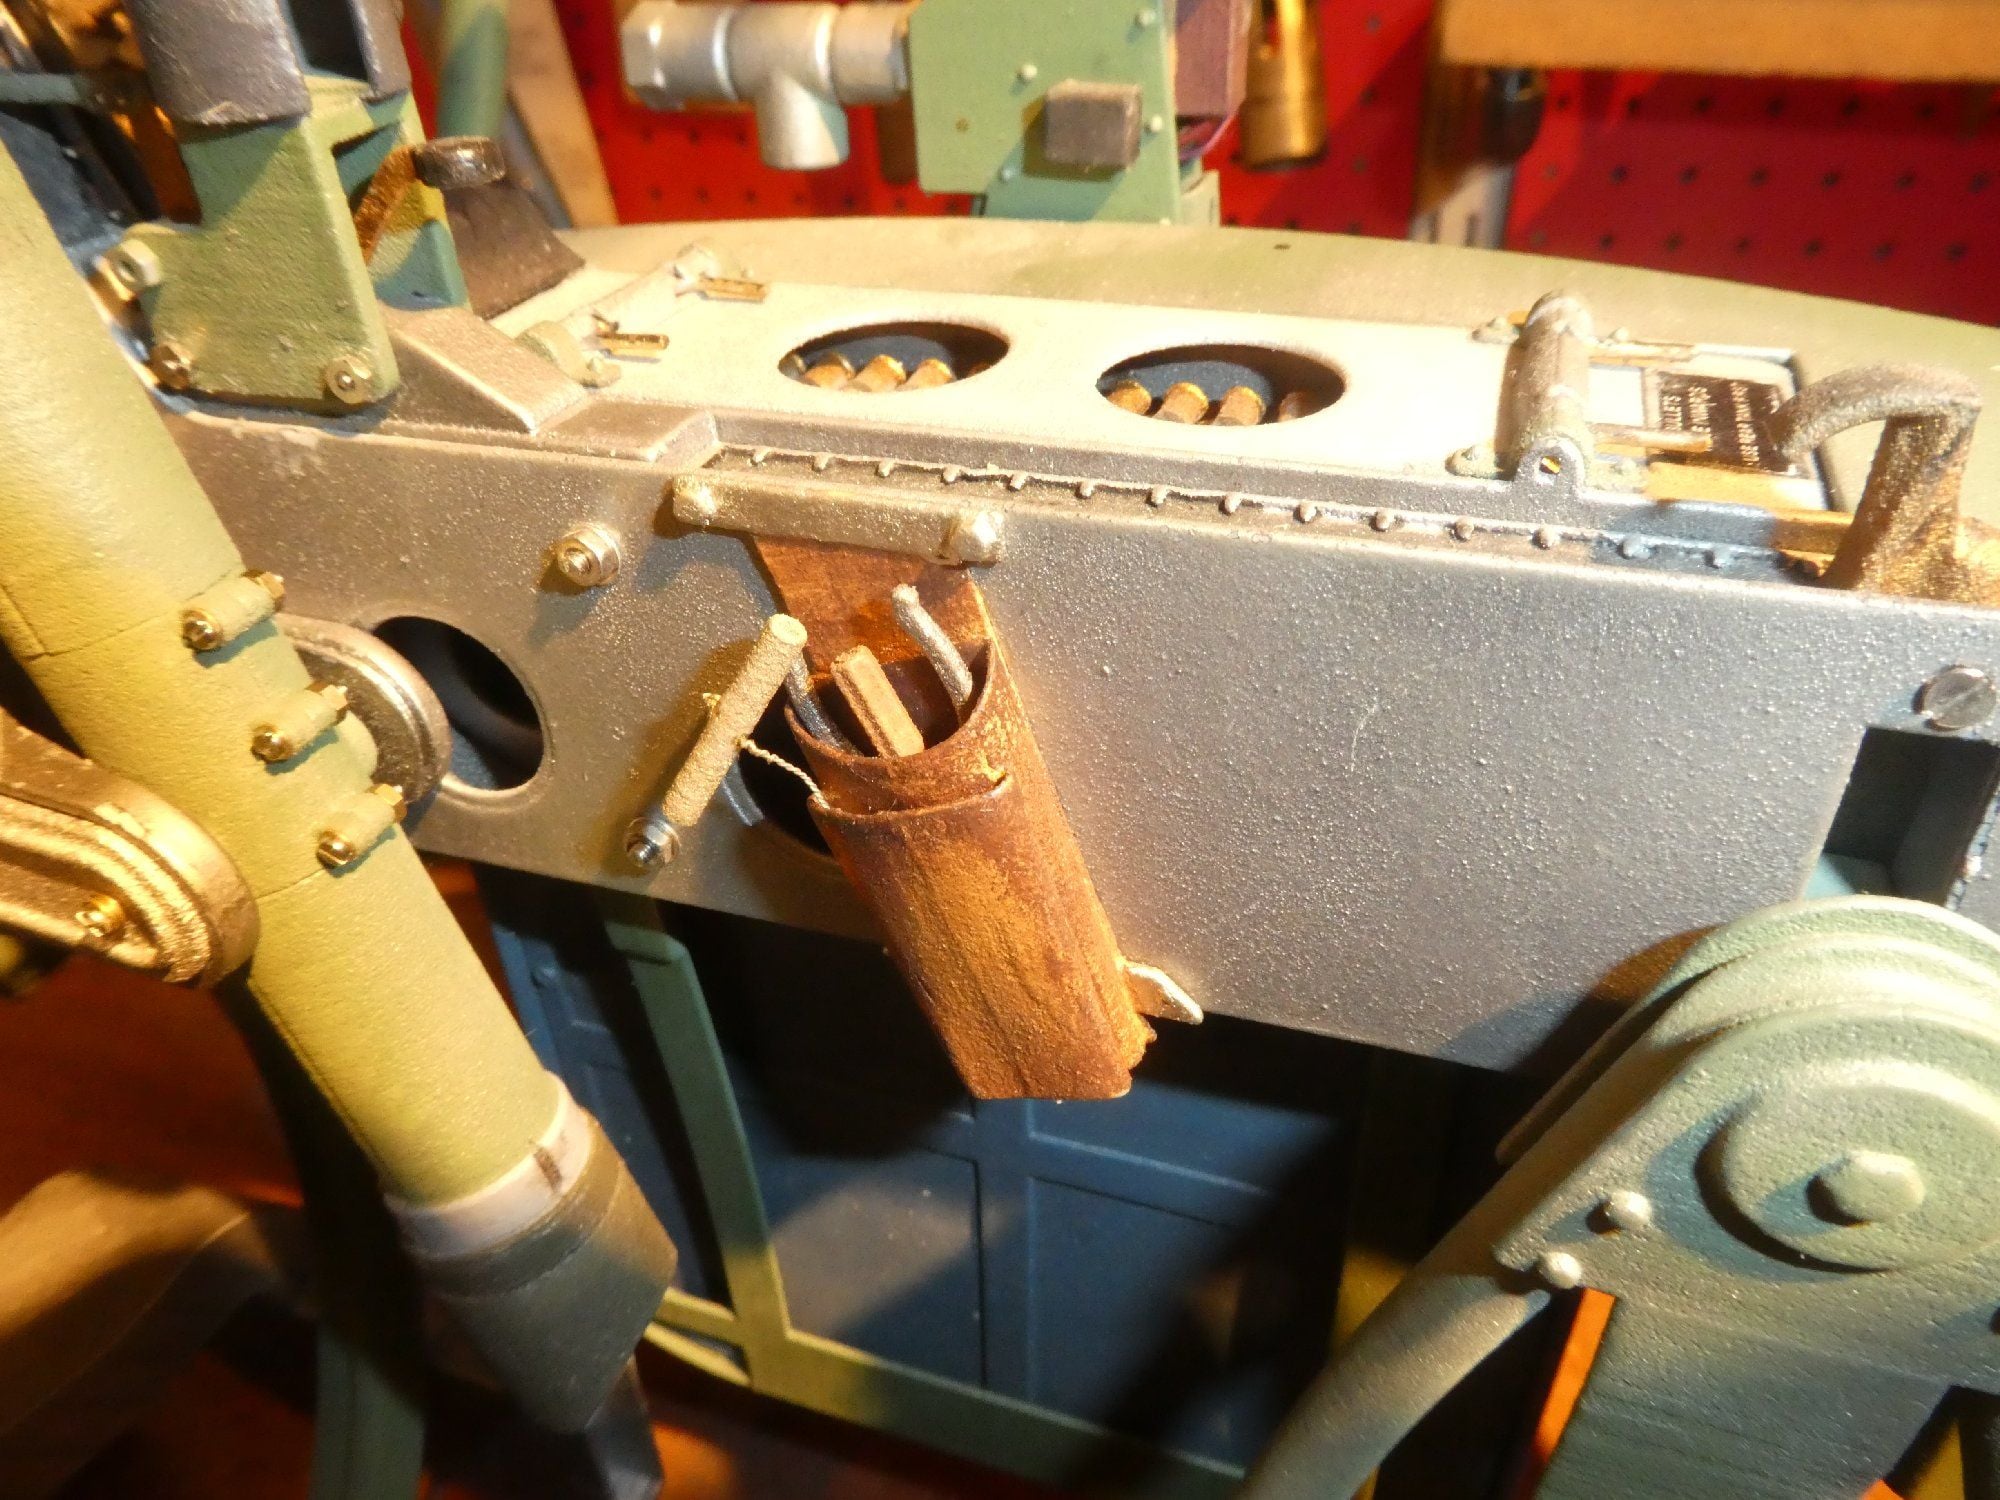
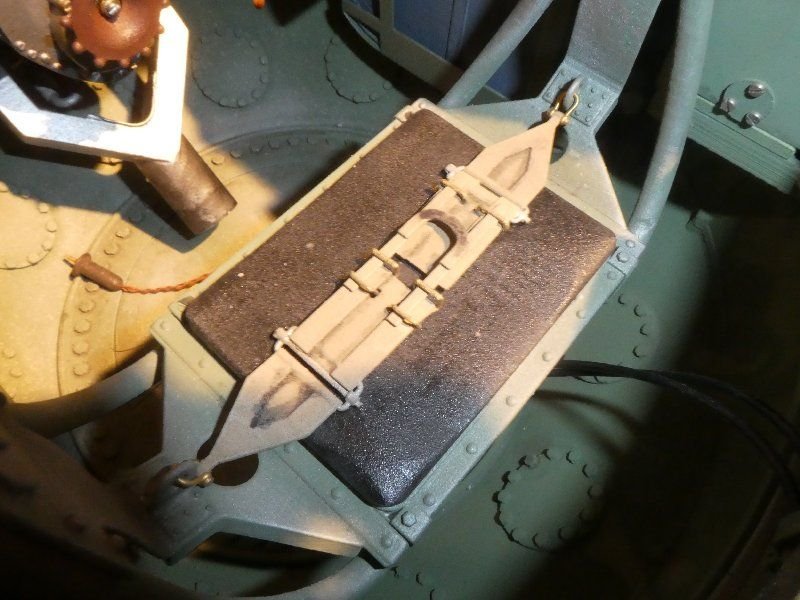
RH tool pouch
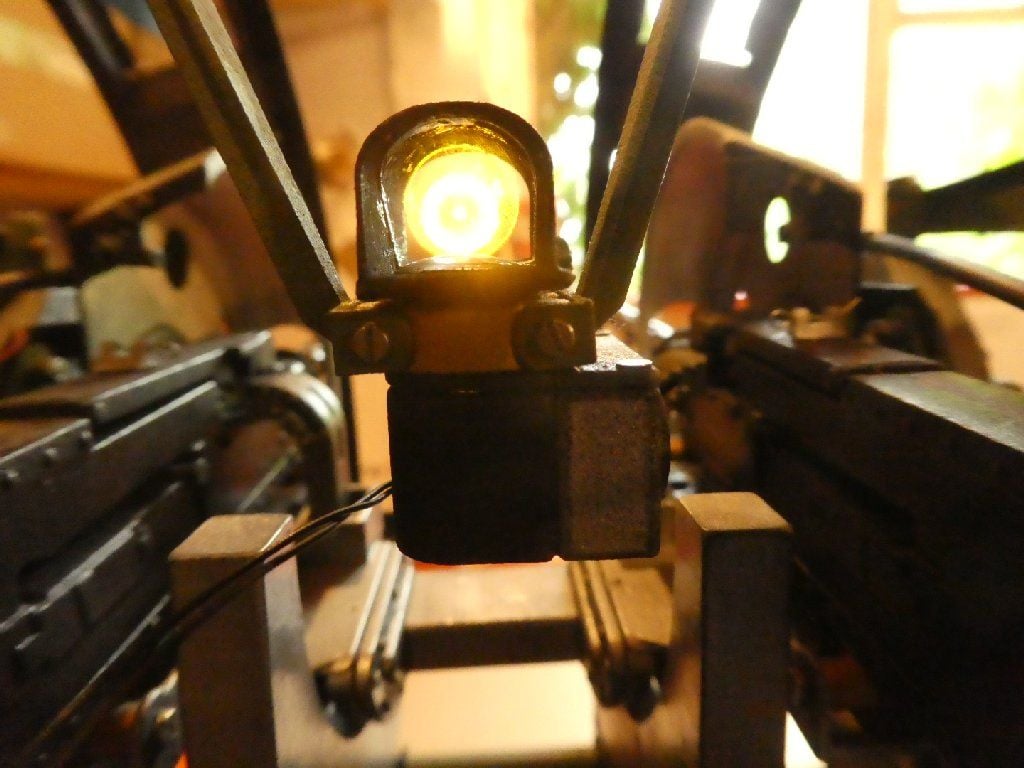
A rather poor photo of the reticule. Dimming was not activated so it is over-bright, and the camera was not focussed on infinity, thereby blurring the reticule
The turrets are designed to be filmed out from, and took 5 years to research, draw and build, although I could now build a pair of turrets in, I think, under 6 months. The hard work was on the CAD side, as I learned Fusion 360 during the course of the project. There were 3 colour schemes in use for such turrets. Early turrets were unpainted, then as manufacture caught up with demand there was a short period where they were painted British Interior Green, wherafter the normal all-black scheme was adopted. I've gone with the green scheme, as the more light inside the turret, the greater the photographic depth of field will exist. As it will be optimal if both turret interior and outside world will be in focus, this will help. The turrets have all working lamps, collimating gunsights, traverse and pneumatically operated elevation, as well as extensive modelling of every switch, circuit breaker, transformer, .303 rounds and hand-dyed period wiring. The rounds in the feed-chutes were individually made and assembled into belts, using a cosmetic link on the viewable side, with a concealed link underneath linking the rounds temporarily until they could be glue into their twisting and curving path within the chutes - which saved having to draw them as a single belt! If anyone would like a similar turret, perhaps in a different scale, weight or level of complexity, I'd be happy to build further ones, although reduction is scale from 1:3.7 may involve changes to build method, mechanical complexity and so forth. Price would be heavily dependant on scale.
One of the difficulties with these was that there are no extant technical drawings, and such plan and side elevation assembly drawings as exist contain numerous errors which had to be corrected. In some cases, these errors were caught late, for example the overly high central console, and the doors. These have been corrected on my master drawings, but remain errors on my built turrets as they were impractical or too expensive, to correct. You may amuse yourselves finding more! One of the hardest aspects was ensuring all moving parts missed each other, whilst also missing the underside of the cupola, which was designed with minimal clearance. Also the front windows are complex-curvatures, and so making these accurately involved considerable efforts to produce a vac-form which looked correct, fitted the internal cupola structure and also allowed moving parts to just miss the underside of the cupola.The next phase is to solve several problems in converting extruded alloy channel into correctly curved geodetic channel (I am utterly hopeless at woodwork!) and produce the internal fittings required to make the joints. So production of the fuselage will likely not commence for a couple of years now.
The latest film of the now completed turrets is linked below this paragraph, but there are many earlier films under the videos tab on my youtube channel. As I was learning to use a video camera, and had no idea about video editing, some of these are a bit repetitive/dull, as it was something I was doing for a few family and friends really. I can recommend the films "moving rams" and "new MK III gunsight" as well as some of the ones covering production of the vac-forming tool.I'm very happy to try and answer questions, or learn of errors. Many thanks to Mark Evans, who provided some component drawings, to Stoney CNC who milled the baseplates, and to Tim Noack who built the gunsight's innards.
I'm very happy to take questions, here and/or on youtube.
A real FN5 on a Wellington
My model from similar angle in B/W
Ditto in colour, with early-war green scheme
View into front turret through access hatch
Rear turret
Rear turret
Rear turret seat and lap strap
Rear turret view of hydraulic stack and piping
General view of front turret
RH tool pouch
A rather poor photo of the reticule. Dimming was not activated so it is over-bright, and the camera was not focussed on infinity, thereby blurring the reticule
 06-15-2020, 05:33 AM
#2

Completed cupolas fitted
A real FN5 on a Wellington
My model from similar angle in B/W
Rear turret model 1:3.7
Ditto in colour, with early-war green scheme
View into front turret through access hatch
Detail of top of ram and hydaulic "stack"
Detail of a control handle
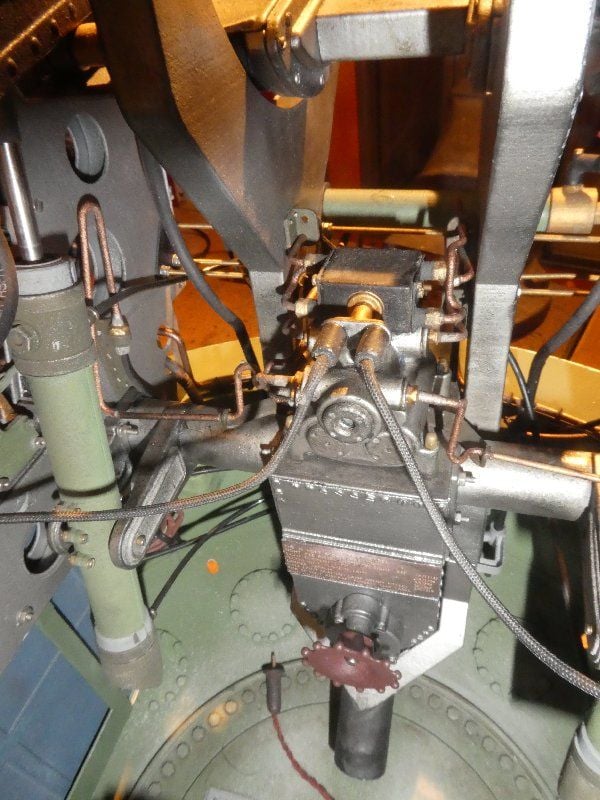
Oxygen supply, RT lead, ammunition tank
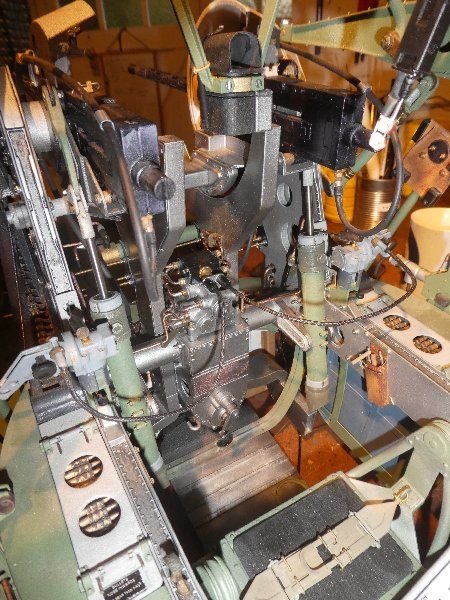
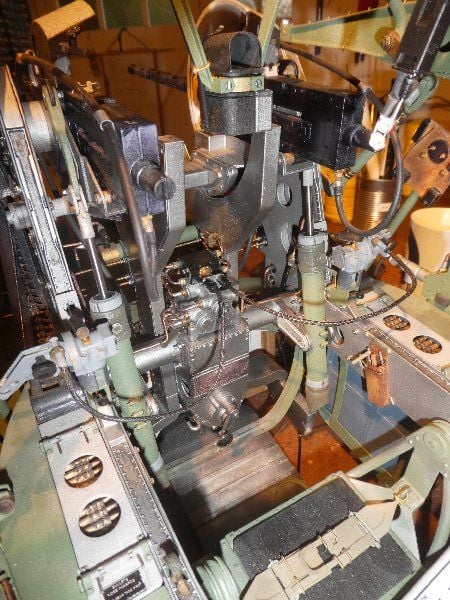
general view of interior of front turret, turret tub not yet fitted in this shot
View of gun-bridge and spent case/link chutes
Exterior view
A rather poor photo of the reticule. Dimming was not activated so it is over-bright, and the camera was not focussed on infinity, thereby blurring the reticule
RH tool pouch
Rear turret seat and lap strap
Completed cupolas fitted
06-15-2020, 09:43 PM
#3
Apologies for the duplication of some images above, I got into a terrible pickle with the album feature.
Here's a link to the latest film on you-tube with footage and stills of the turrets moving in elevation, and a cook's tour of the models. There are many many films - it has to be said of indifferent quality - documenting the builds, and mould-making to vac-form the complex-curved cupola windows.
If you find this interesting, please subscribe and/or like on youtube
I'm also very happy to answer questions.
These turrets are available as commission build, price on application. There's a minimum build time of 6 months, and the costs of printing parts accurate enough to make these mechanisms is very high. For now, only 1:3.7 scale is available.


